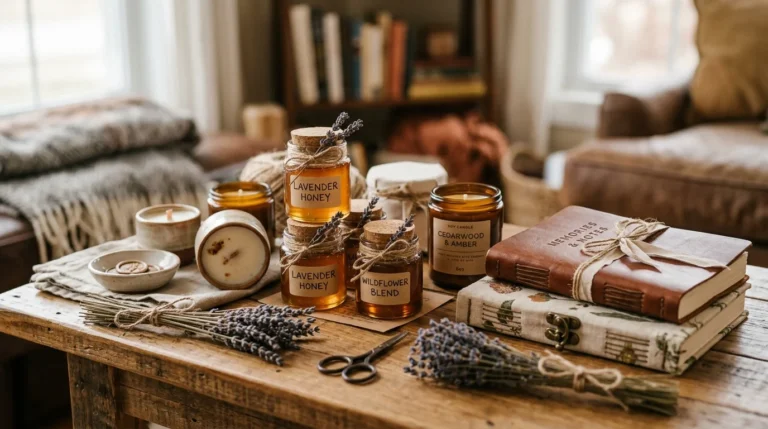
16 Creative Book Art DIY Projects That Turn Old Books Into Masterpieces
Old books deserve more than a dusty shelf or a donation bin. Whether they are falling apart at the spine or simply no longer being read, they hold real creative potential. With some basic craft supplies and a free afternoon, you can turn them into wall art, home decor, sculptural pieces, and functional objects that look like they came from a boutique shop. These 16 DIY book art projects are practical, affordable, and satisfying to make. No advanced skills required — just patience and a little imagination.
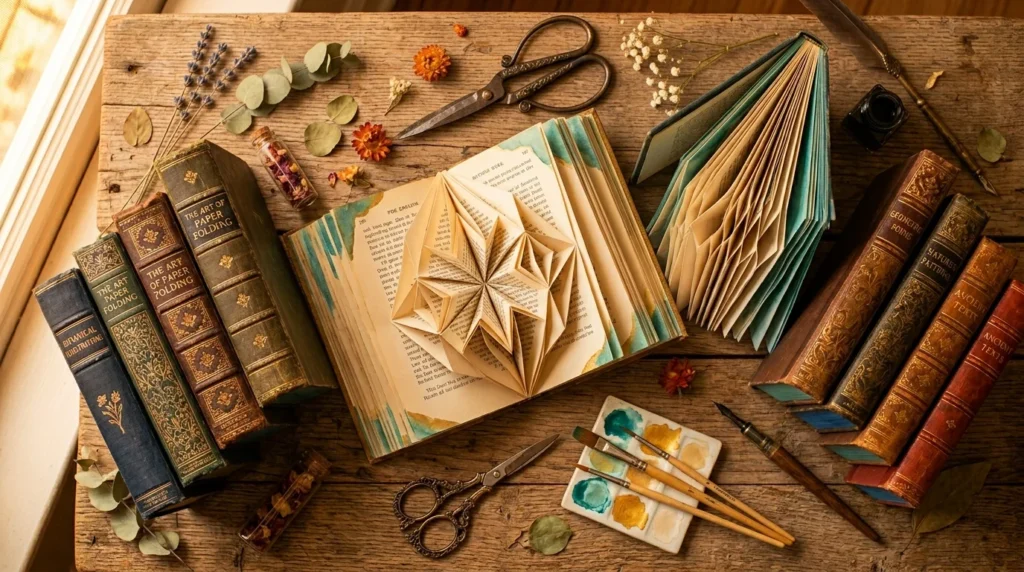
1. Folded Book Page Sculptures
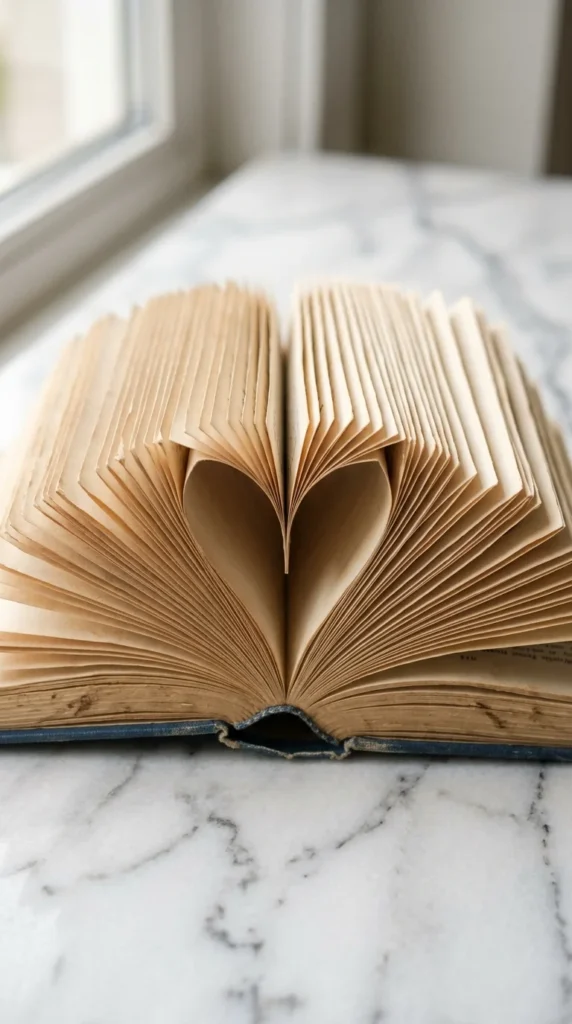
Folded book sculptures are one of the most satisfying DIY projects out there. You only need an old hardcover book and a printed folding pattern.
The idea is simple. Each page gets folded to a specific angle and depth. When you step back, the folds create a shape — a heart, a word, a star, or a number.
Here’s how to start:
- Find a hardcover book with at least 200 pages.
- Download a free folding pattern online (search “book folding pattern PDF”).
- Fold each page slowly, using a bone folder or the back of a spoon for crisp edges.
The whole project costs nothing if you already have the book. A bone folder runs about $5 at a craft store. You can also use a butter knife.
These sculptures look stunning on a bookshelf or side table. They also make very personal gifts — fold someone’s name or initials into a book that meant something to them.
Budget tip: Thrift stores sell hardcover books for under $1. Pick ones with clean pages for the best results.
2. Book Page Wreaths
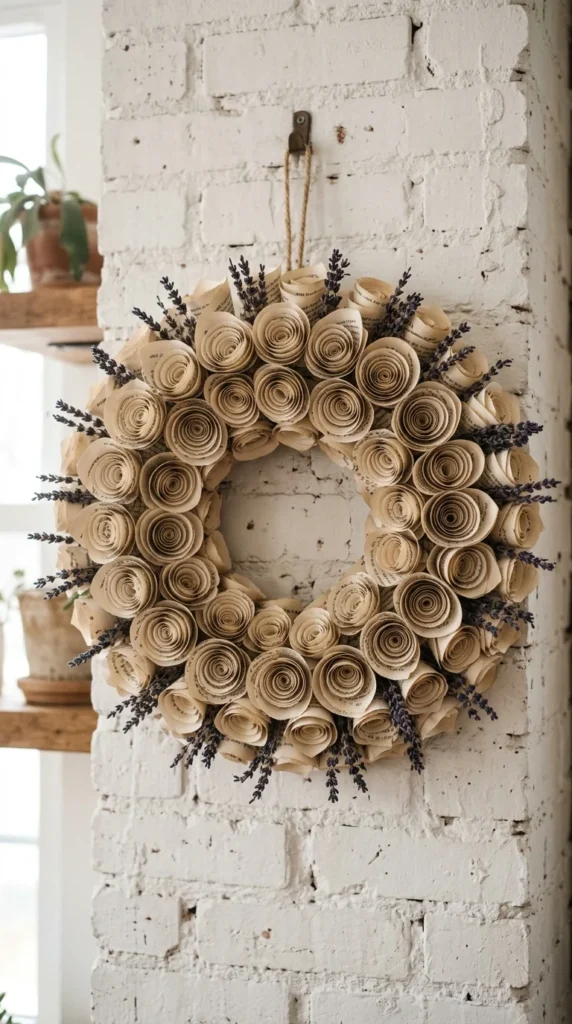
A book page wreath is an elegant way to use old paperbacks. The finished piece looks expensive but costs almost nothing.
You roll individual pages into tight cones or rosettes, then arrange them in a circle on a foam or cardboard ring.
What you need:
- One paperback book with 150+ pages
- A foam or cardboard wreath form (under $3 at a dollar store)
- Hot glue gun and glue sticks
- Optional: spray paint, ribbon, or dried flowers
Tear pages out one by one. Roll each page into a cone shape from corner to corner and secure it with a dot of glue. Then glue each cone onto the wreath ring, working from the outside in.
Variations to try:
- Spray paint the finished wreath gold or white for a cleaner look.
- Mix in dried eucalyptus or small pinecones for texture.
- Use music sheet pages instead for a more vintage tone.
This project takes about two to three hours. The result is a wall piece you’ll get compliments on every time someone visits. A full wreath uses roughly one average-sized paperback.
3. Hollowed Book Secret Box
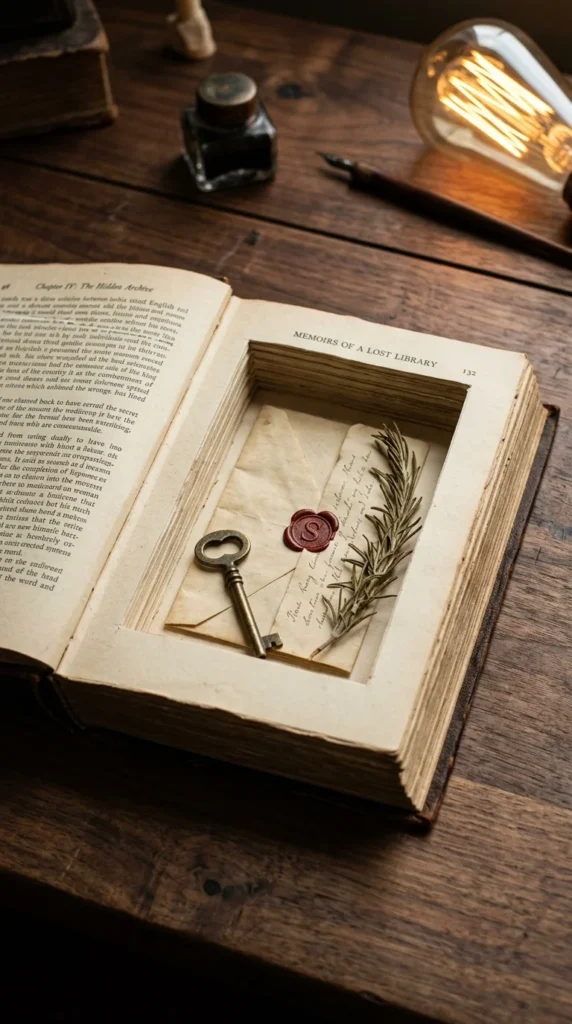
A hollowed book is one of the most functional DIY projects you can make from an old hardcover. It looks like a regular book on a shelf but opens to reveal a hidden compartment.
Tools you need:
- A thick hardcover book (at least 1.5 inches deep)
- A sharp craft knife or box cutter
- A metal ruler
- White glue diluted with water
- A paintbrush
Start by sealing the pages together. Mix white glue with a bit of water and brush it along the three open edges of the book while it’s closed. Let it dry completely.
Then draw a rectangle on the first page — leaving a one-inch border on all sides. Cut through the pages slowly, a few at a time. Keep the cuts straight.
Once you reach the depth you want, brush the inside walls with the same glue mixture and let it dry. This seals everything together and gives the compartment a sturdy finish.
Use it for: Jewelry, keys, a passport, folded notes, or small valuables. It’s a discreet storage option that blends into any bookshelf.
Budget tip: This entire project costs under $3 if you already have a craft knife.
4. Book Page Butterflies Wall Art
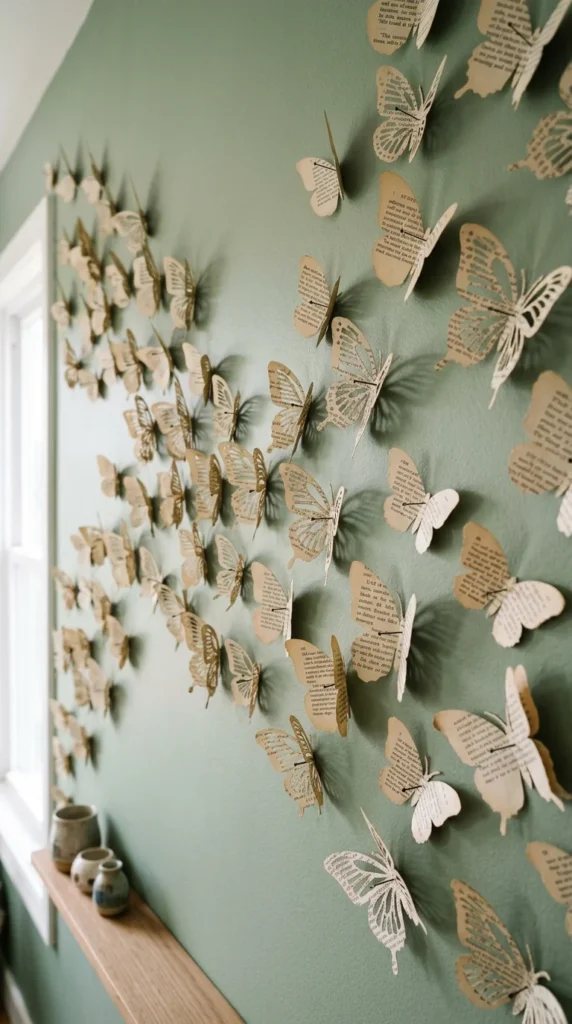
Book page butterflies are a charming and low-effort wall art project. Even beginners can pull it off in a single afternoon.
What you need:
- Old book pages (any book works)
- A butterfly template (print one from the internet)
- Scissors or a craft knife
- A pencil
- Pins or small pieces of foam tape
Trace the butterfly template onto book pages and cut them out. You’ll want to make at least 30 to 50 of them for a full wall display.
How to create the 3D effect:
- Fold each butterfly slightly down the center.
- Mount them to the wall using a push pin at the center body, leaving the wings lifted.
- The wings will cast small shadows that make the butterflies look like they’re flying.
Vary the sizes — some large, some tiny. Cluster them tightly in some areas and let them spread out in others.
Color tip: Leave them natural for a neutral, rustic look. Or lightly watercolor the wings in soft blues, pinks, or yellows before mounting.
This project costs nearly nothing. A pack of push pins is about $2. The whole display can cover a large wall for under $5.
5. Altered Book Collage Art

Altered book art turns an old book into a mixed-media canvas. Each spread becomes its own little artwork.
This project is perfect if you enjoy journaling, scrapbooking, or painting but want a more structured surface to work on.
How to get started:
- Choose a thick hardcover book with uncoated (non-glossy) pages.
- Seal a few pages together with gesso or white paint to create a sturdier surface.
- Start layering on any combination of paint, torn paper, stamps, dried flowers, or washi tape.
There are no rules here. Some people cover the text completely. Others leave parts of it visible, letting words peek through the art and add meaning.
Budget-friendly supplies to try:
- Acrylic craft paint (under $2 a bottle)
- Washi tape from the dollar store
- Old magazines or maps for collage pieces
- Coffee or tea for staining pages with a warm vintage tone
You can treat each page differently. Make some pages chaotic and layered, others minimal and clean.
Altered book art is also a great gift. Personalize it with photos, pressed flowers from someone’s garden, or colors that match their home.
6. Book Spine Wall Quote
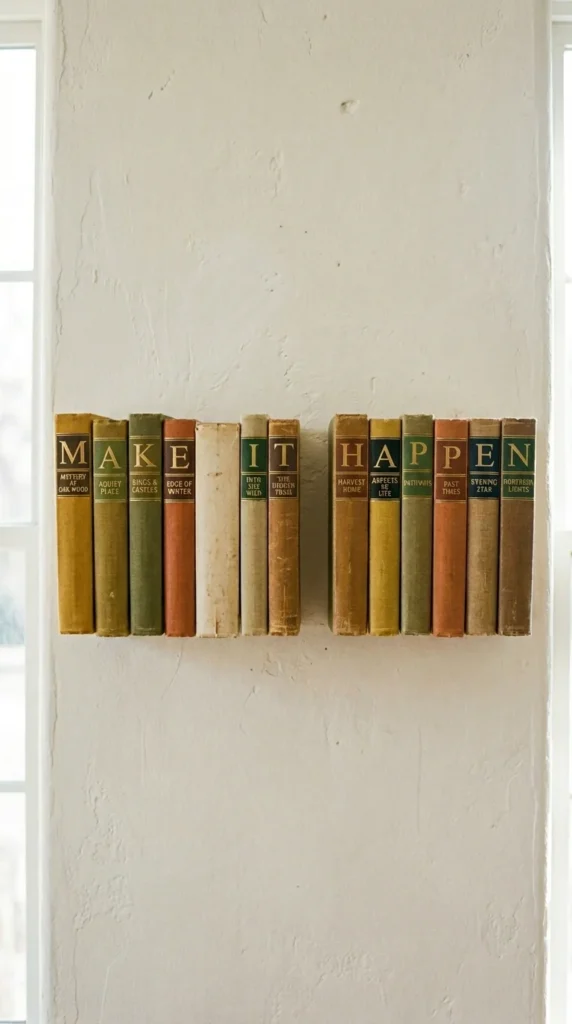
This project plays on book titles to create a readable message on your wall. It’s clever, literary, and completely free if you already have the right books.
The idea is to find books whose titles, when stacked or arranged together, form a meaningful sentence or phrase.
Examples of messages people create:
- “Today is a good day”
- “You are enough”
- “Adventure awaits”
You can search sites like Instagram or Pinterest for inspiration, or browse your own shelves and a local thrift store to find the exact titles you need.
How to display them:
- Stack them vertically on a shelf with spines facing out.
- Or mount them horizontally on the wall using floating shelves spaced evenly.
- You can also lay them flat and photograph them from above for a different presentation.
Thrift store tip: Most thrift shops sell paperbacks for 25 to 50 cents. You can usually find what you need for under $5.
This project takes more hunting than crafting, but the result is a personalized, literary piece of decor that sparks conversation every time someone reads it.
7. Book Page Roses
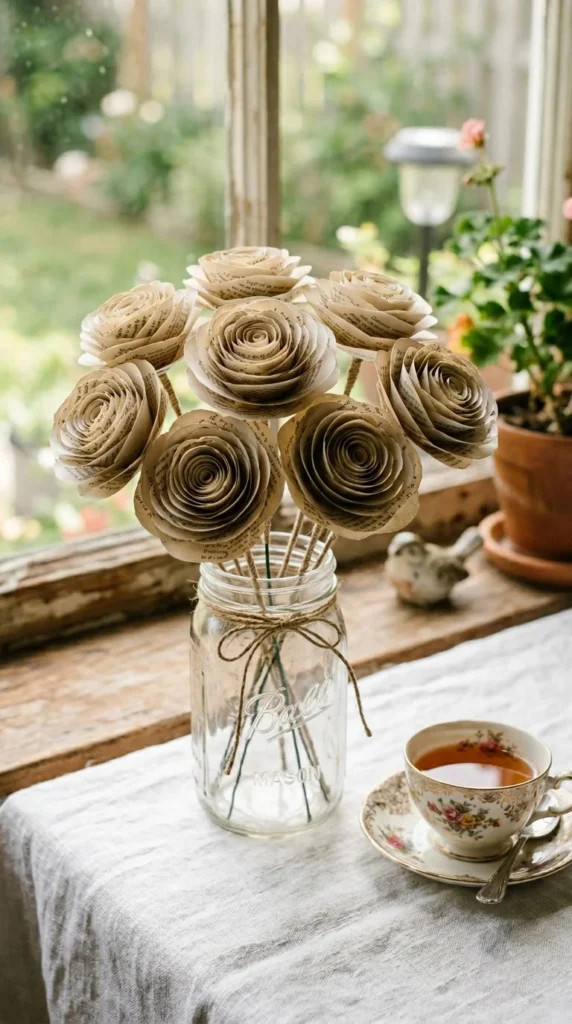
Book page roses look incredibly lifelike and can last forever — unlike real flowers. They’re also one of the most popular book art projects for beginners.
What you need:
- Book pages (any kind)
- Scissors
- Hot glue gun
- A wire stem or wooden skewer
- Optional: watercolor paint or tea staining
Steps to make one rose:
- Cut pages into rough circles, making each one slightly smaller than the last.
- Roll the largest circle into a tight center bud and glue it closed.
- Wrap each remaining petal around the bud, gluing at the base and curling the top edge outward with your finger.
- Add a leaf shape cut from a page and glue it at the base.
The whole process takes about 10 minutes per rose once you get the hang of it.
Color ideas:
- Dip the petal tips in diluted brown paint for an antique look.
- Use watercolor to tint them pink, lavender, or blue.
- Leave them natural and cream-colored for a minimalist display.
Arrange several in a vase or mason jar. They make beautiful table centerpieces, photo props, or gifts.
8. Decoupage Furniture with Book Pages
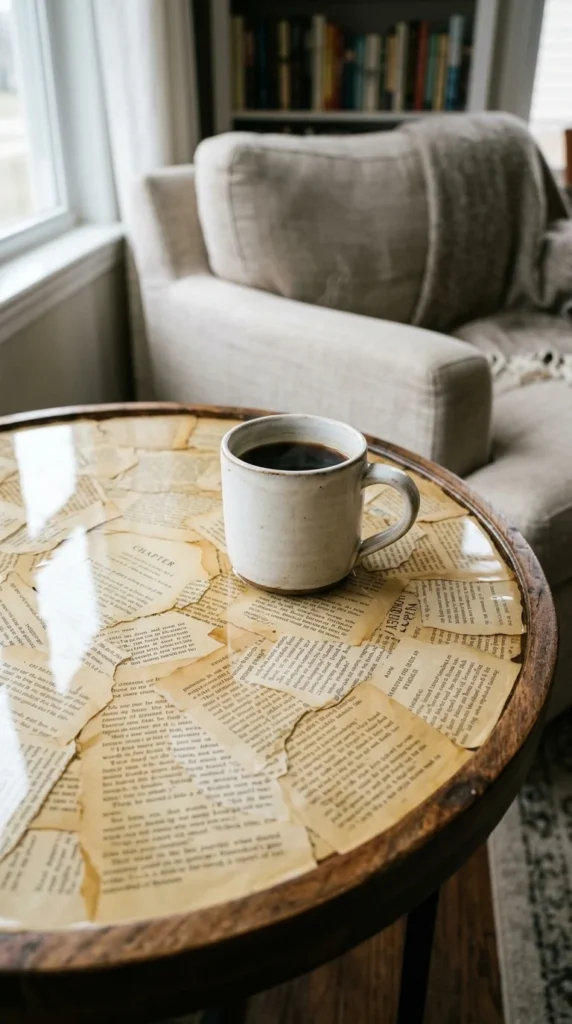
Decoupage transforms plain furniture into statement pieces using nothing but paper and glue. Book pages are perfect for this — they have texture, typography, and history built right in.
Furniture that works well:
- Side tables
- Small drawers or nightstands
- Wooden trays
- Flower pots
What you need:
- Old book pages (torn into irregular pieces)
- Mod Podge (about $7) or DIY mix of white glue and water
- A foam brush
- A piece of furniture with a clean, dry surface
How to do it:
- Brush a thin coat of Mod Podge onto a small section of the furniture.
- Press a torn page piece onto the wet glue, smoothing out bubbles with your fingers.
- Brush another layer of Mod Podge over the top to seal it.
- Overlap pieces as you go, covering every bit of the surface.
- Let each layer dry before adding the next.
Finish with two to three sealing coats on top. For extra durability on a tabletop, use a clear spray varnish.
Budget tip: A thrifted side table from a garage sale can cost $2. Add a few hours and $7 of glue, and you have a custom furniture piece.
9. Book Page Gift Wrapping
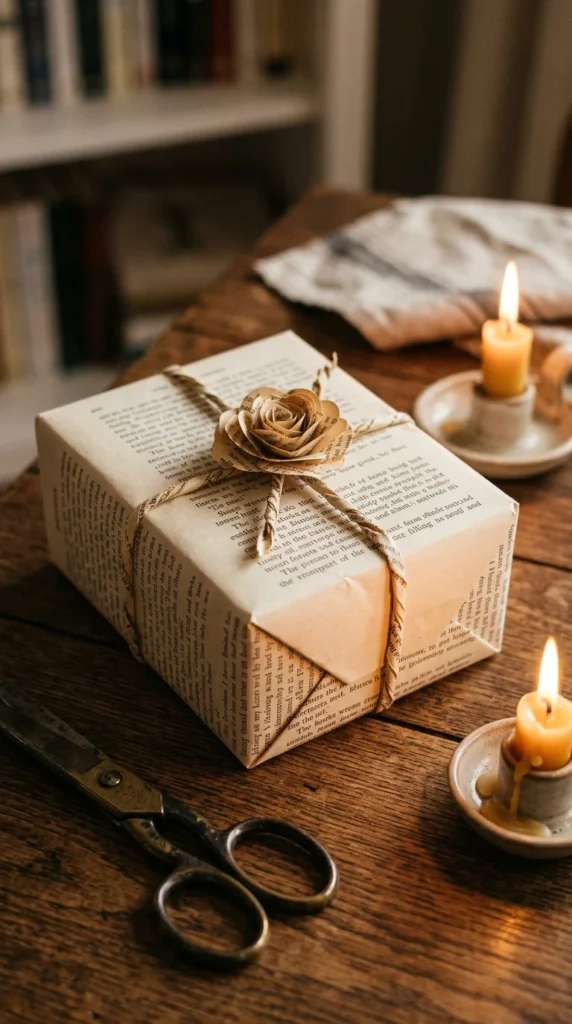
This is the fastest and most practical way to repurpose book pages. Instead of buying wrapping paper, use old book or newspaper pages to wrap gifts.
It looks thoughtful, literary, and intentional — never cheap. And it’s completely free.
How to make it look polished:
- Use pages with interesting typography or dense text for texture.
- Fold the edges cleanly and use tape minimally.
- Add a simple ribbon made from a torn strip of book page twisted tightly and tied in a bow.
- Top it with a small book page rosette or a sprig of dried greenery.
Gift tag idea: Cut a small rectangle from a heavier page, punch a hole in the corner, and write your message directly on the text side. Thread a piece of twine through the hole.
For a premium look:
- Stain the pages with tea or coffee before wrapping for a warm sepia tone.
- Stamp a small design (star, heart, leaf) on the wrap before tying it.
This works beautifully for birthday gifts, housewarming presents, and holiday packages. It takes about the same amount of time as regular wrapping.
10. Stacked Book Lamp Base
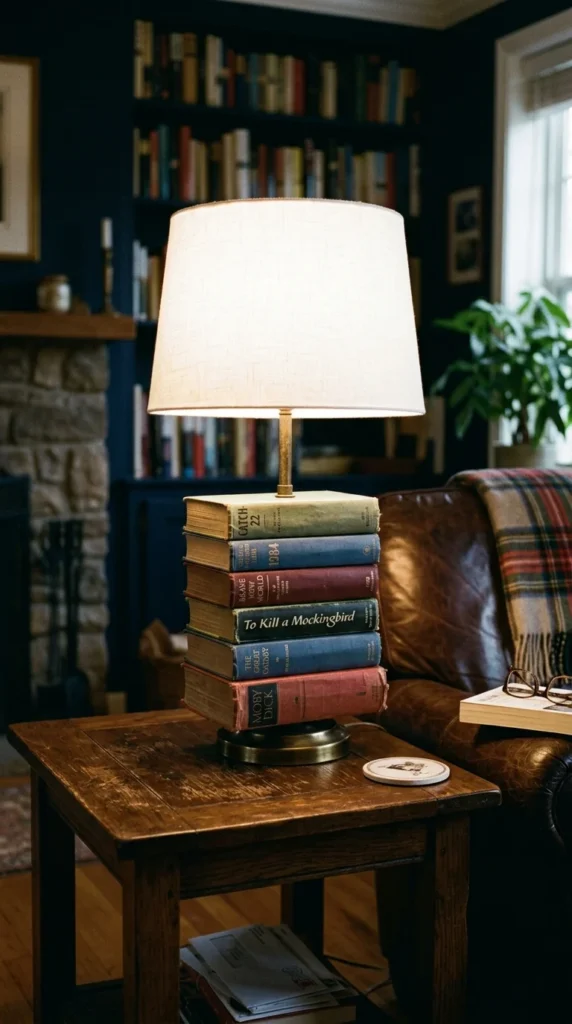
Stacking books to form a lamp base is one of the most dramatic DIY projects on this list. The result looks like something from a designer home catalog.
What you need:
- 4 to 8 hardcover books of similar width
- A lamp kit (available online or at hardware stores for under $15)
- A drill with a long drill bit
- A lampshade
- Strong adhesive or threaded rod
Two approaches:
The simple approach: Stack the books on a surface, thread the lamp cord up through holes drilled through the center, and glue the stack together. Add a lamp holder on top and attach a shade.
The cleaner approach: Use a lamp kit with a threaded rod that runs through the center of all the books, securing them together with nuts on each end.
Book selection matters:
- Mix different spine colors for a rainbow effect.
- Use books of the same size for a cleaner stack.
- Arrange them by color or height for visual balance.
This project is great for a reading nook or home office. If drilling feels too advanced, a hardware store can often drill the holes for you for a small fee.
11. Book Page Bowls
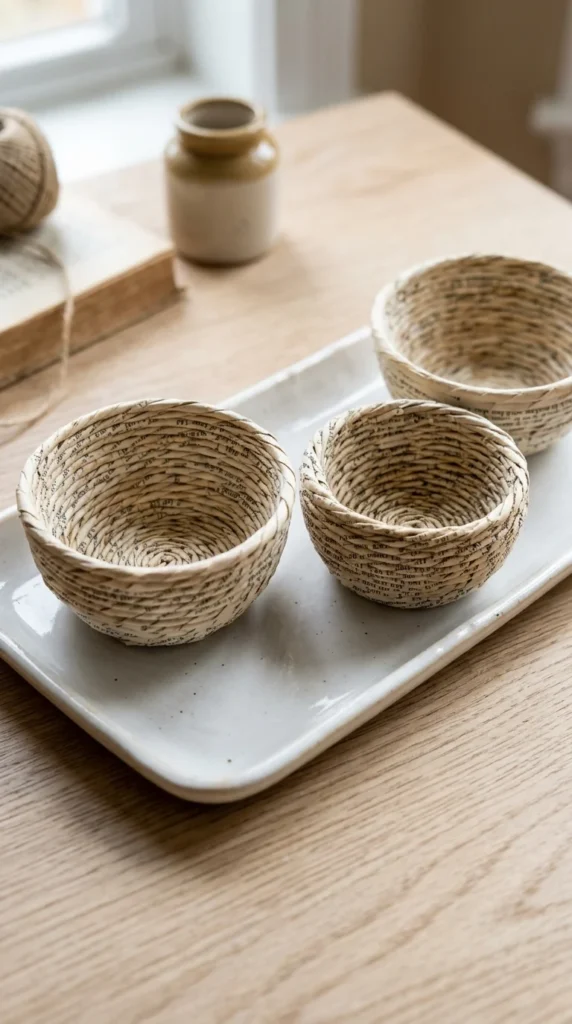
Book page bowls are surprisingly sturdy when finished, and they make for beautiful display pieces or small catchall organizers on a dresser or desk.
What you need:
- Book pages
- Scissors
- White glue or Mod Podge
- A balloon or small bowl as a mold
- Foam brush
Method 1 — Paper coiling:
Cut pages into long, thin strips. Roll each strip tightly into a coil and glue the end down. Glue coils together side by side, starting from the center bottom, curving upward to form bowl walls. Let each row dry before adding the next.
Method 2 — Paper mâché:
Tear pages into small pieces. Inflate a small balloon to the size you want. Brush on diluted glue, then layer pieces of page over the balloon, overlapping them. Add three to four layers. Let it dry fully, then pop and remove the balloon. Trim the top edge cleanly.
Finishing:
Brush two sealing coats of Mod Podge over the finished bowl to harden and waterproof it slightly. You can also paint the inside a solid color for contrast.
Budget tip: This project costs under $3 total and makes a great gift paired with a small plant, candle, or jewelry piece inside.
12. Book-Turned-Planter
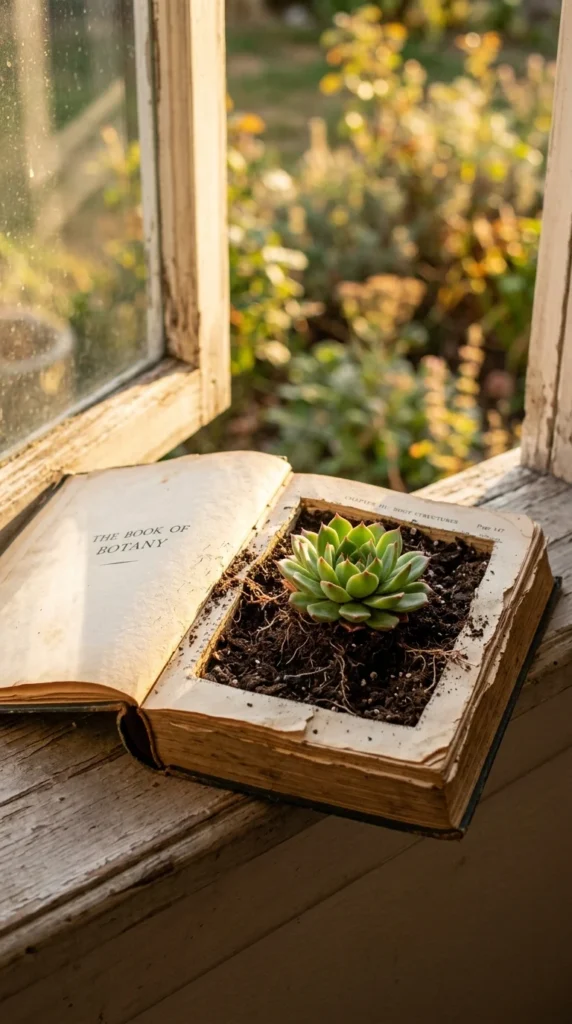
Turning a hollowed book into a planter is one of the most eye-catching projects on this list. It’s unexpected, charming, and easy to make.
What you need:
- A thick hardcover book (at least 2 inches deep)
- A plastic container or bag that fits inside the hollow
- Potting mix
- A small succulent or cactus
- Strong waterproof glue
Steps:
- Follow the same hollowing process as the secret box project — cut out a rectangular cavity leaving a one-inch border on all sides.
- Line the inside of the cavity with a small plastic bag or cut-down container to protect the pages from moisture.
- Fill the liner with potting mix.
- Plant your succulent and press it gently into the soil.
- Keep the book open at a slight angle to show off the interior.
Best plants to use:
- Small succulents (they need minimal watering)
- Air plants (no soil required — just set them in the cavity)
- Moss (no watering needed, very dramatic)
Display this on a coffee table, shelf, or windowsill. It will always get questions from visitors.
13. Book Page Chandelier
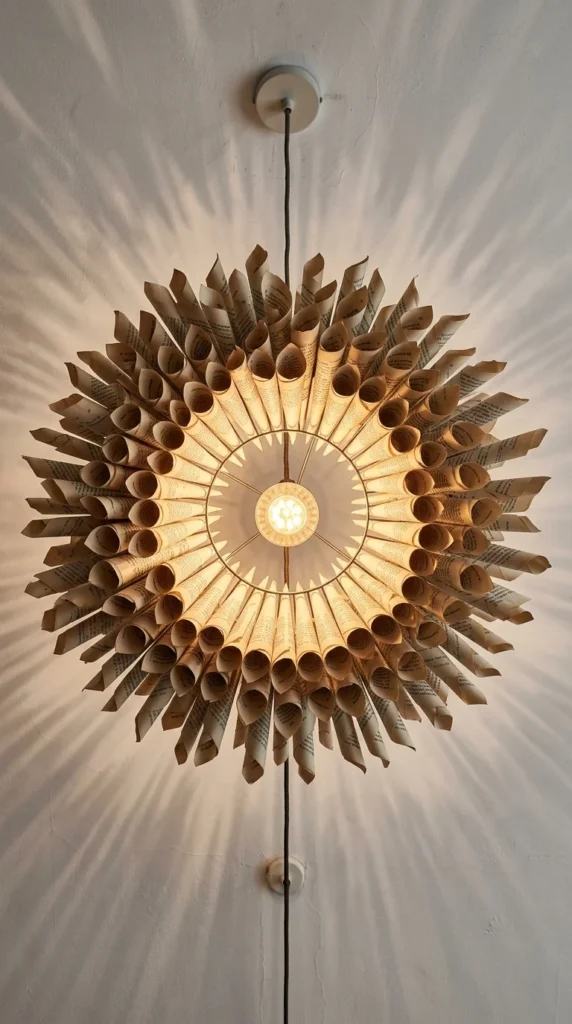
A book page chandelier or pendant light shade is a statement piece that transforms any room. It looks complex but is made entirely from rolled paper cones.
What you need:
- Two to three old books (paperback or hardcover)
- A wire pendant light kit (under $15 online)
- A wire globe frame or balloon mold
- Hot glue gun
- A low-wattage LED bulb (cool, not hot, for fire safety)
How to make it:
- Roll each book page into a tight cone shape and seal with a dot of hot glue.
- Attach cones to the wire globe frame starting from the bottom, pointing outward.
- Work in rows, gluing each cone tightly against the last.
- Continue until the entire frame is covered.
- Thread the pendant cord through the top of the globe.
Safety note: Always use LED bulbs. They produce minimal heat, making paper shades much safer.
The finished chandelier works beautifully in a reading corner, above a dining table, or in a bedroom. It casts a soft, warm, patterned light across the ceiling.
Cost estimate: Under $20 total if you source the pendant kit online.
14. Book Spine Clock
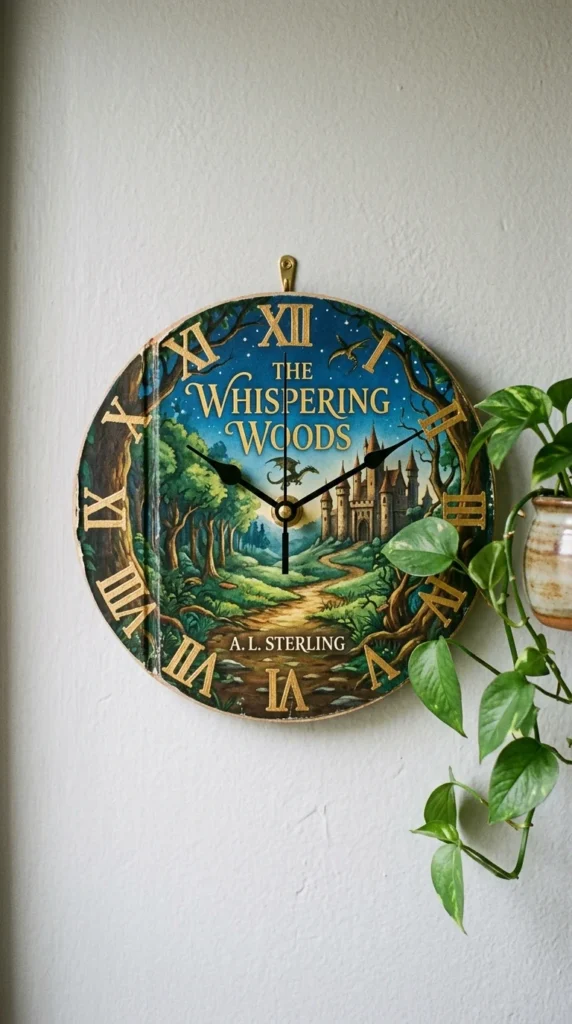
Turning a hardcover book cover into a wall clock is a simple and striking DIY that takes less than an hour.
What you need:
- A thick hardcover book with a cover you love
- A clock mechanism kit (under $5 online or at a craft store)
- A drill or sharp awl
- Batteries
Steps:
- Remove the cover carefully from the book. You can score the spine with a craft knife and peel the cover away cleanly.
- Mark the exact center of the cover with a pencil.
- Drill a small hole through the center — just large enough for the clock shaft.
- Push the clock mechanism through the hole from the back and secure the nut on the front.
- Attach the clock hands.
- Mark the 12, 3, 6, and 9 positions with small dots or Roman numerals in metallic marker.
No need to mark all 12 hours — a clean clock with just the cardinal positions looks modern and intentional.
Display it on a study wall or kitchen. It’s functional and personal, especially if the book had meaning to you.
15. Book Page Jewelry
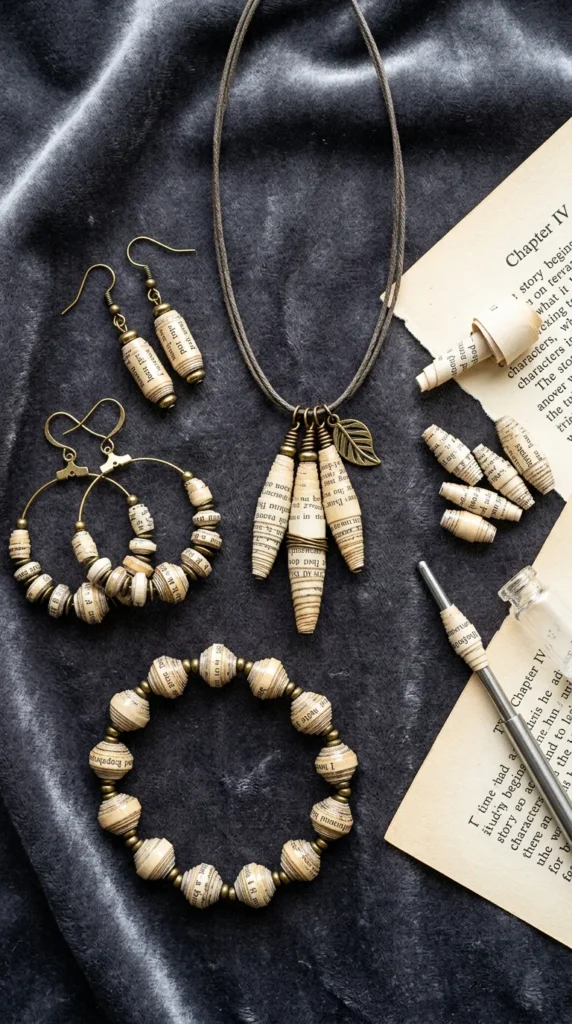
Book page beads are small, lightweight, and can be made into necklaces, earrings, and bracelets. The finished pieces look polished and handcrafted — not at all like paper.
What you need:
- Book pages cut into long triangles
- Toothpicks or bamboo skewers
- White glue
- Mod Podge or resin to seal
- Jewelry findings (hooks, clasps, wire) from a craft store
How to make beads:
- Cut a long isosceles triangle from a book page — wide at one end, pointed at the other.
- Dab a tiny bit of glue along the surface.
- Start rolling from the wide end, keeping it tight around a toothpick.
- Remove the toothpick once the bead is formed and glue the pointed end down.
- Seal the bead with Mod Podge or dip it in clear resin for a glossy finish.
Make consistent beads by cutting all your triangles the same size from a template.
String finished beads onto wire or cord. Mix with wooden beads or metal spacers for variety.
Budget tip: A set of earring hooks costs under $3. You can make an entire jewelry set for less than $5.
16. Book Page Shadow Box Art
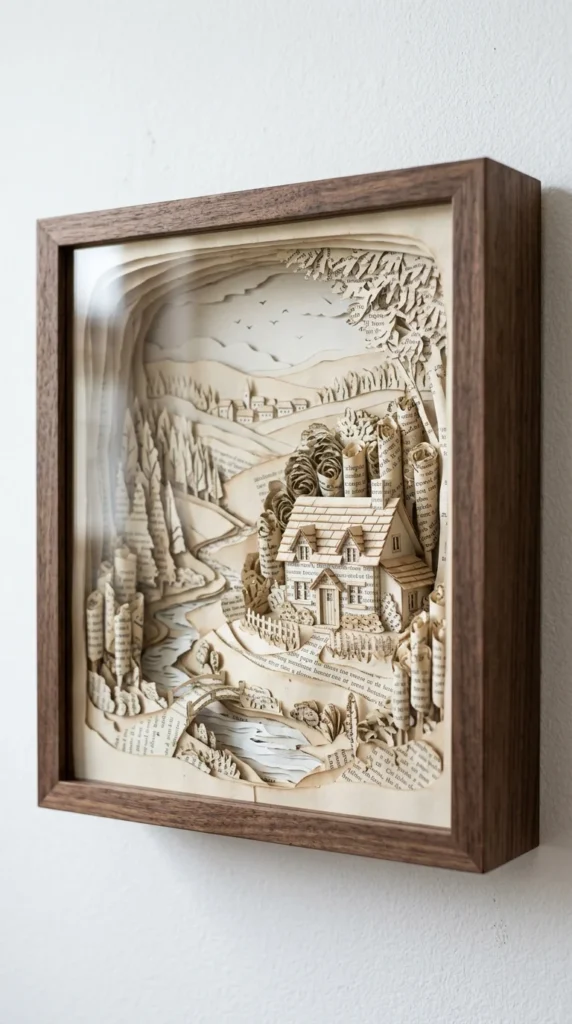
A shadow box filled with layered book page scenes creates a stunning piece of dimensional wall art. It looks like it belongs in a gallery.
What you need:
- A deep shadow box frame (3 to 5 inches deep — available at thrift stores or craft stores)
- Book pages
- Scissors and craft knife
- Foam mounting squares (for spacing layers)
- Optional: watercolor paint
How to build the scene:
- Start with a background layer — a flat page glued to the back of the frame.
- Cut your next layer slightly larger than the frame so it curves slightly when inserted.
- Add foam squares between layers to create visible depth.
- Build up 5 to 8 layers for maximum 3D effect.
- Each layer can be a simple silhouette — hills, trees, buildings, birds.
Scene ideas:
- A forest with rolling hills
- A city skyline
- An ocean with waves
- An abstract geometric pattern
Color tip: Leave all layers natural cream for a minimal look. Or watercolor the back layers softly — deep blue fading to pale at the front — for a color gradient effect.
This is the most time-intensive project on the list but also the most rewarding. Budget two to three hours and you’ll end up with a wall piece that looks completely one-of-a-kind.
Conclusion
Old books carry a quiet beauty that doesn’t have to end on a shelf. Every cracked spine and yellowed page can become raw material for something new. Whether you want a five-minute project like book page gift wrapping or a multi-hour build like a shadow box scene, there’s something here that fits your time, budget, and skill level.
Start small. Grab one old book, pick one project, and spend an afternoon making something with your hands. The supplies are cheap, the process is meditative, and the results are genuinely impressive.
The best part? No two pieces will ever look exactly alike. Each project carries the personality of the book it came from — the font, the illustrations, the weight of the pages. That’s what makes book art special. It doesn’t just decorate a space. It tells a story.