21 Gorgeous Kitchen Decor Hacks That Transform Your Space Fast
Your kitchen doesn’t need a full renovation to look completely different. Small, affordable changes can make a massive visual impact — and most of them take less than a weekend. Whether you’re renting, working with a tight budget, or just tired of staring at the same boring space, these 21 hacks will help you create a kitchen that feels intentional, warm, and genuinely yours. No contractor needed. No big spending required. Just smart, simple ideas that actually work.
1. Swap Out Cabinet Hardware Instantly
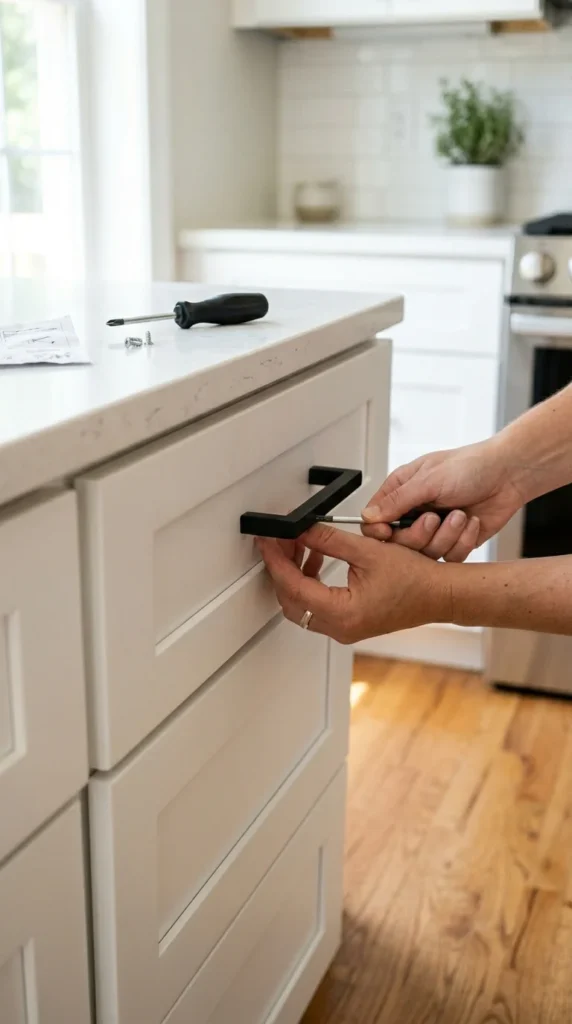
Cabinet hardware is like jewelry for your kitchen. It’s small, but it changes everything.
Old brass knobs from 1995? They’re making your whole kitchen feel dated — even if everything else is clean and updated.
Replacing hardware is one of the cheapest upgrades you can do. A set of matte black bar pulls or brushed gold knobs costs $20–$60 total from Amazon, IKEA, or Home Depot.
Here’s how to do it without stress:
- Measure the hole spacing on existing hardware first (most are 3″ or 3.75″ apart).
- Pick one finish and stick to it throughout the kitchen.
- Use a screwdriver — no drilling needed if you’re replacing existing holes.
The whole swap takes under an hour. The result looks like a professional designer touched your space.
Go for matte black if your kitchen is white or light-toned. Choose brushed brass if you have warm wood cabinets. Brushed nickel works with almost everything.
This single change makes cabinets look custom, modern, and expensive — without touching the paint or spending more than $50.
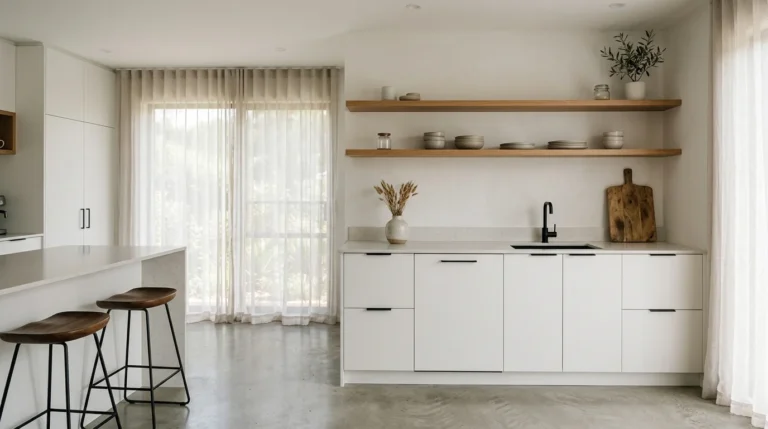
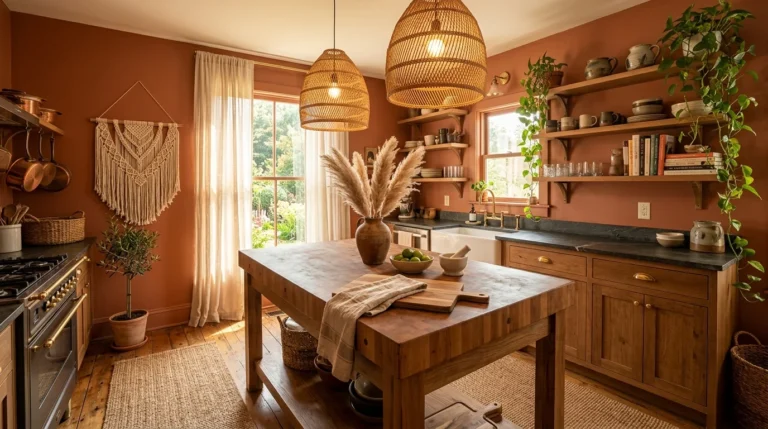
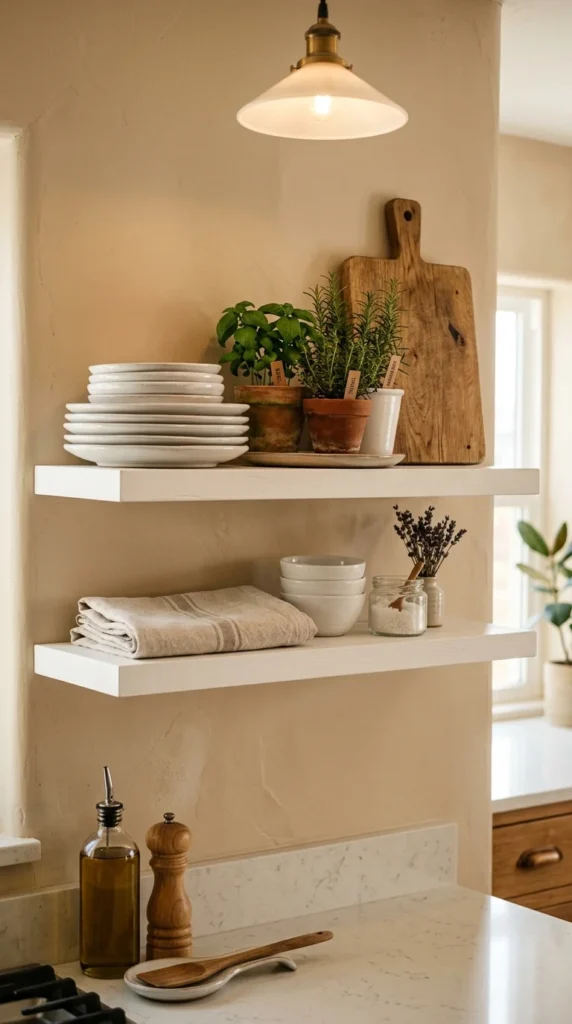
2. Add Open Shelving With Floating Brackets

Open shelves make a kitchen feel bigger, brighter, and more lived-in — in the best way.
You don’t need to tear out cabinets. Just add one or two floating shelves to an empty wall or above the counter where you prep food.
Budget-friendly options:
- IKEA BERGSHULT shelves with matching brackets: around $30–$50 per shelf.
- Unfinished pine boards from Home Depot, stained with Minwax in walnut or oak: under $20.
- Black metal pipe brackets for an industrial farmhouse feel: $15–$25 per pair on Amazon.
What to put on them:
- Stack 3–4 matching plates or bowls for a clean, curated look.
- Add a small potted herb like basil or rosemary.
- Place a wooden cutting board leaning at the back for texture.
- Group a few ceramic mugs by color.
The key is negative space. Don’t fill every inch. Leave room to breathe.
Open shelves work especially well in kitchens that feel dark or cramped. They draw the eye up, create vertical interest, and make the space feel more open without removing a single wall.
3. Paint the Inside of Cabinets a Bold Color
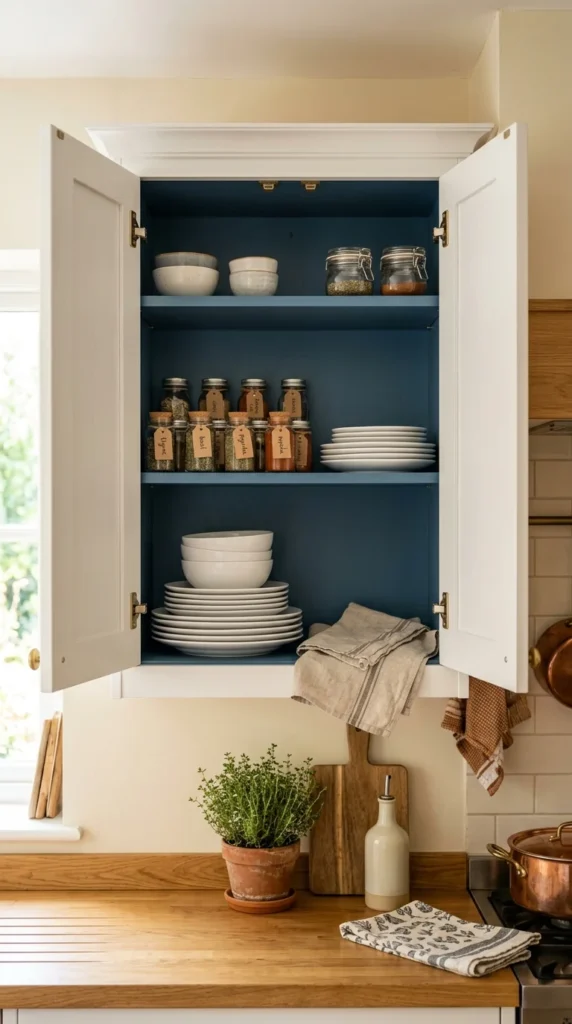
Nobody talks about this trick enough — and it’s one of the most dramatic, low-cost changes you can make.
Paint the inside back panel of your upper cabinets in a contrasting color. Keep the outside white or whatever it already is. The inside becomes a surprise pop of personality every time the doors open.
Great colors to try:
- Dusty navy blue
- Sage green
- Terracotta
- Deep forest green
- Warm mustard
You only need a small sample pot of paint — usually $4–$6 at any hardware store. One pot covers 2–4 cabinet interiors easily.
Steps to do it right:
- Remove everything from the cabinet.
- Lightly sand the back panel.
- Apply two coats of paint with a small foam roller.
- Let dry completely before restocking.
This works especially well if you have glass-front cabinet doors — the color shows through beautifully. But even solid-door cabinets get a lovely pop of surprise when opened.
It’s unexpected, artistic, and costs almost nothing. Guests will ask who designed your kitchen.
4. Use Peel-and-Stick Backsplash Tiles
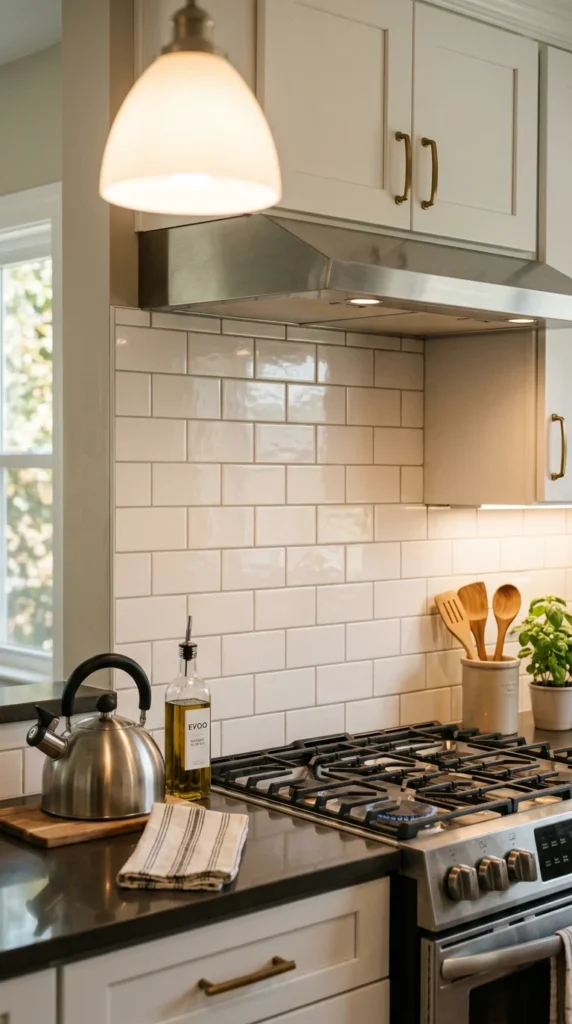
A backsplash completely changes the personality of a kitchen. But real tile installation is expensive and messy.
Peel-and-stick tile panels are the smarter move.
They look shockingly realistic, peel off without damage (great for renters), and install in under two hours with no tools, no grout, and no professional help.
Popular styles available on Amazon and at Home Depot:
- White subway tile (classic, works everywhere)
- Moroccan encaustic patterns (bold and boho)
- Marble hexagon (modern and elegant)
- Dark slate (dramatic, moody kitchens)
How to install:
- Clean the wall surface thoroughly — grease is the enemy of adhesion.
- Measure and cut panels with scissors or a utility knife.
- Peel the backing and press firmly from the center outward.
- Smooth out bubbles with a credit card.
Prices range from $25–$60 for a standard backsplash area. That’s a fraction of real tile costs.
When guests see it, they’ll assume you hired someone. You’ll know you did it yourself on a Saturday afternoon with zero stress.
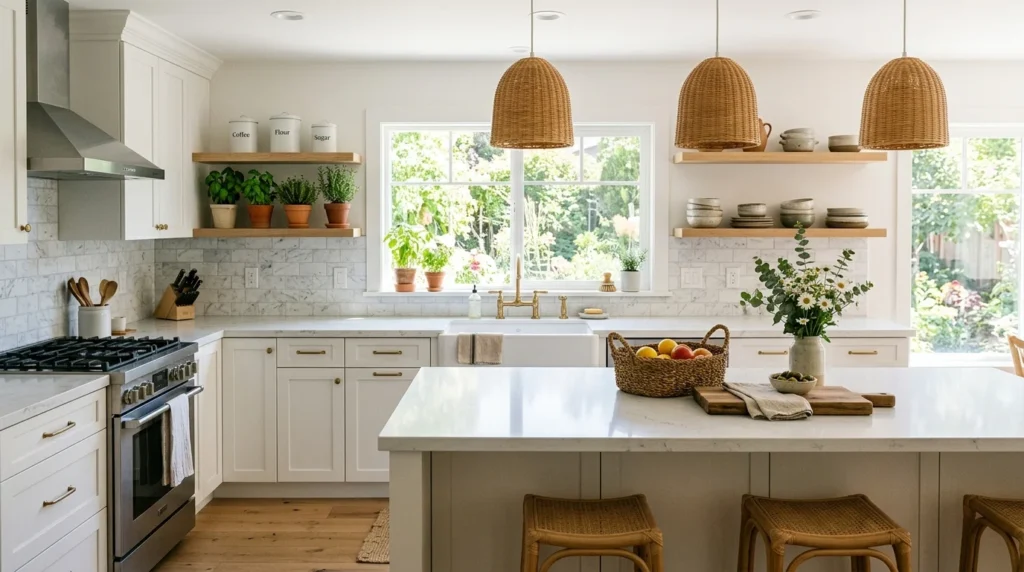
5. Hang a Statement Pendant Light
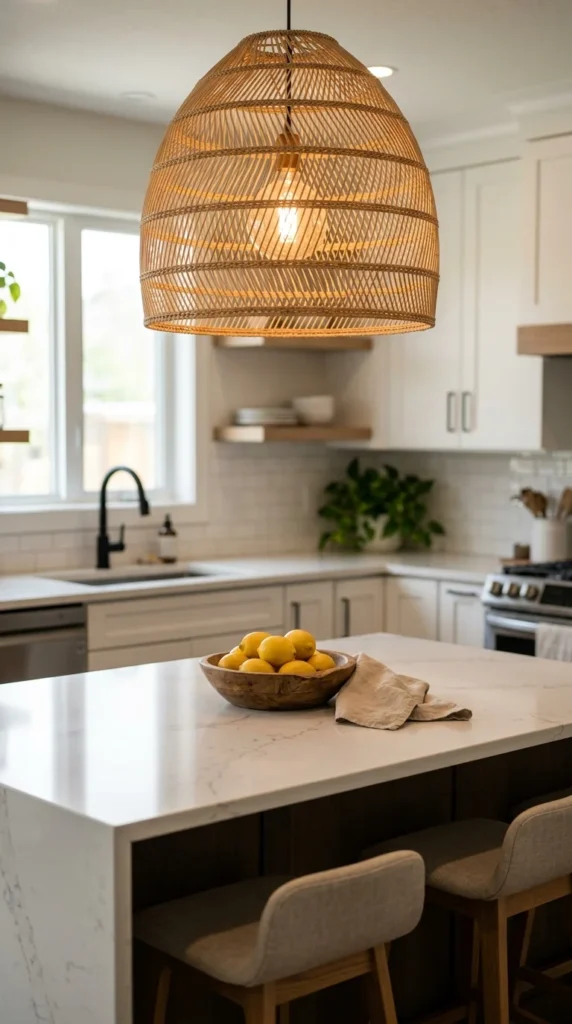
Lighting is one of the most overlooked design tools in a kitchen. Most homes have builder-grade fluorescent fixtures that make everything look flat and clinical.
One statement pendant light changes the entire mood of the room.
You don’t need to rewire anything. Plug-in pendant lights hang from a ceiling hook and plug directly into an outlet. No electrician. No permit. No problem.
Great styles to try:
- Rattan or wicker shades for a warm, boho feel
- Black iron cage pendants for an industrial look
- Ceramic dome shades for a modern Scandinavian vibe
- Amber glass for a vintage, moody atmosphere
Where to buy affordably:
- Amazon: plug-in pendants start at $25–$45
- IKEA: cord pendant kits for $15–$30
- Thrift stores: vintage glass shades for under $10
Hang one over your kitchen island or dining table. Use a warm-white Edison bulb (2700K) for the coziest result.
The change in ambiance from cold overhead light to warm pendant glow is immediately noticeable. It makes your kitchen feel like a place people actually want to gather.
6. Style Your Counter Like a Chef’s Station
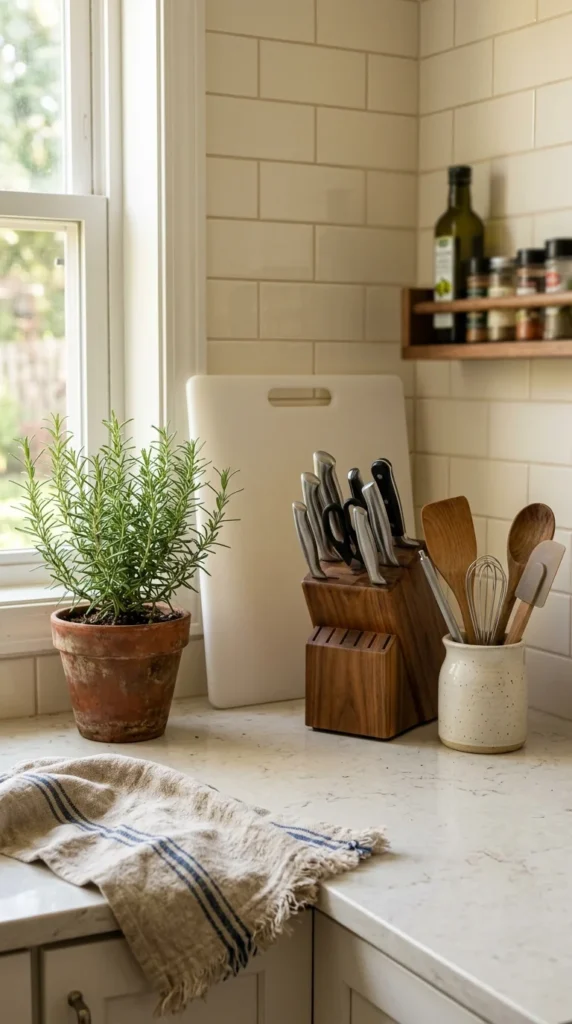
A messy counter makes even the most beautiful kitchen feel chaotic. But a beautifully styled counter makes even a basic kitchen look intentional.
Think of your counter as a curated display, not just a dumping ground.
The rule of three works perfectly here: group items in sets of three — one tall, one medium, one small — for natural visual balance.
What to include on a styled counter:
- A wooden knife block or magnetic knife strip
- A ceramic crock holding your most-used utensils
- One small potted herb (basil, rosemary, or mint)
- A cutting board leaned against the backsplash
- A linen dish towel folded neatly at the edge
What to remove:
- Paper towel rolls left out without a holder
- Stacks of random mail or receipts
- Appliances you use less than once a week (store them inside)
Keep only what earns its place on the counter. If it’s not useful or beautiful, it goes in a drawer or cabinet.
This costs nothing if you already own these items. It’s purely about editing and arranging — and it makes the biggest visual difference of anything on this list.
7. Install a Magnetic Knife Strip
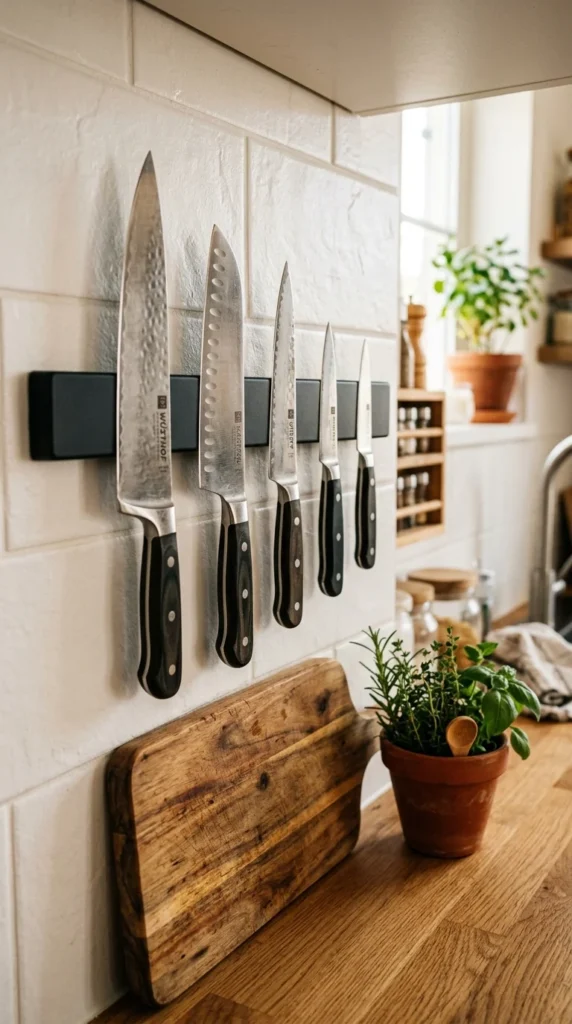
A magnetic knife strip is a $20 upgrade that looks like it belongs in a professional kitchen.
It clears counter clutter, keeps knives accessible, and adds an instant chef-worthy aesthetic to any blank wall space.
Where to mount it:
- On the wall directly beside or above your prep area
- On the side of a cabinet or refrigerator
- On a section of backsplash tile (use the adhesive version for renters)
Best options on Amazon:
- Wooded magnetic strips (walnut or bamboo): $20–$35
- Matte black metal: $15–$25
- Stainless steel for a modern/industrial look: $18–$30
Installation tips:
- Use a stud finder to mount into wall studs for safety.
- For renters, look for adhesive-backed versions that hold up to 10 lbs.
- Mount at eye level — around 4–5 feet from the floor.
Arrange knives from largest to smallest for a clean, organized look. Keep scissors or a peeler on the end for functional variety.
The visual impact far outweighs the cost. It tells anyone who walks into your kitchen that the person cooking here actually knows what they’re doing.
8. Add a Kitchen Runner Rug
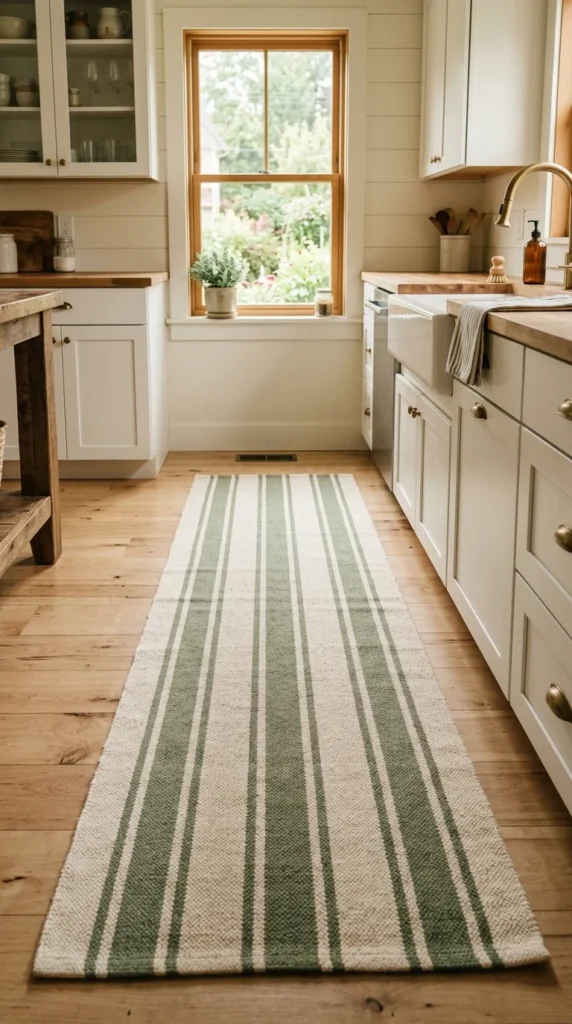
A rug in the kitchen sounds unusual to some people — but it’s one of the fastest ways to add warmth, color, and personality to the space.
A kitchen runner instantly makes the room feel cozy, designed, and complete.
What to look for in a kitchen rug:
- Flat-weave or low-pile (easier to clean, less tripping hazard)
- Machine-washable (essential for a kitchen)
- Non-slip backing or a separate rug pad underneath
- Colors or patterns that complement your cabinet and floor tones
Great affordable options:
- Amazon Basics cotton runner: $20–$35
- IKEA SÖNDERÖD or KÖPENHAMN runners: $15–$40
- Target Studio McGee collection: $30–$60
Where to place it:
- In front of the sink (where you stand most)
- In front of the stove
- Running lengthwise through the center of a galley kitchen
Stick to stripes or simple geometric patterns for a timeless look. Avoid overly busy prints that compete with everything else in the room.
This small addition adds texture underfoot, protects your floor, and makes the kitchen look like someone with real style lives there.
9. Decorate With a Fruit Bowl or Bread Box

Not all decor needs to be purely decorative. Functional items styled beautifully are the secret weapon of every great kitchen.
A fruit bowl filled with colorful produce is essentially free art. Lemons, limes, green apples, and oranges together in a wooden or ceramic bowl look like a still-life painting — and they cost nothing extra because you were going to buy fruit anyway.
Best fruit bowl styles:
- Round walnut wood bowl: $25–$40 on Amazon
- Woven rattan basket: $15–$30
- White ceramic bowl: $10–$20 from IKEA or Target
Pair it with a bread box for a cohesive counter vignette. A white enamel or stainless steel bread box keeps bread fresh and looks intentional on the counter.
Pro tips for styling a fruit bowl:
- Stick to 2–3 colors of fruit for a clean look
- Add a small sprig of greenery like eucalyptus for texture
- Never overfill — leave some visible bowl space
Together, a fruit bowl and bread box create a styled moment on your counter that feels lived-in and welcoming — without spending more than $30–$50 total.
10. Refresh Cabinet Doors With Paint
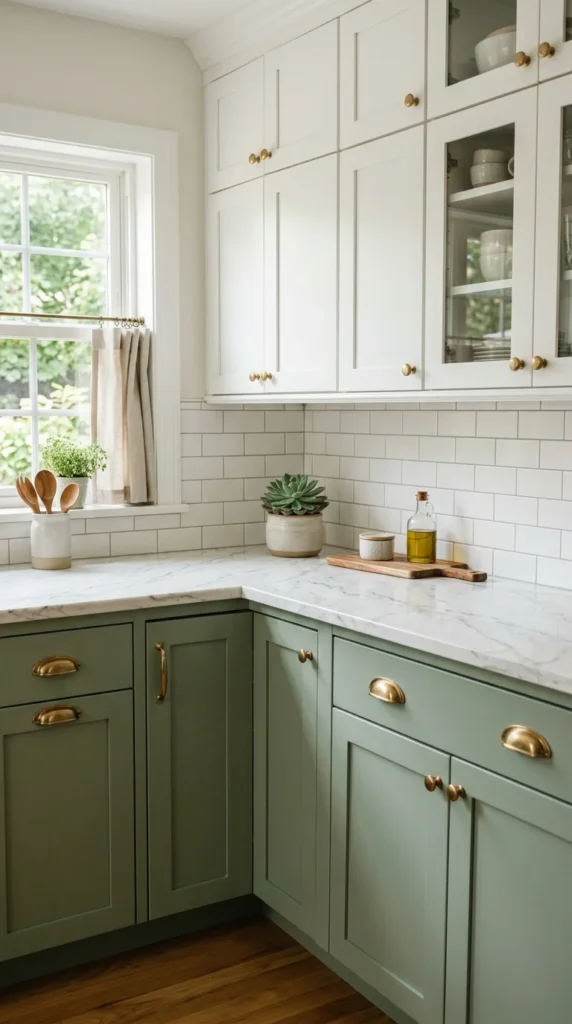
Painting cabinets is one of the highest-impact, lowest-cost transformations in home decor. Done right, it looks like a full kitchen renovation.
You don’t need to paint all the cabinets. A popular two-tone approach — white uppers, colored lowers — is modern, fresh, and much more forgiving to execute.
Best cabinet paint colors right now:
- Sage green (warm, organic, timeless)
- Navy blue (bold, classic, dramatic)
- Warm white or soft cream (bright, clean, classic)
- Terracotta (earthy, Mediterranean, bold)
- Charcoal grey (sleek, modern, sophisticated)
What you need:
- Cabinet paint (Benjamin Moore Advance or Sherwin-Williams Emerald Urethane): $50–$70/gallon
- Foam roller and angled brush
- Liquid deglosser (no sanding required with this)
- Painter’s tape
Steps:
- Remove hardware and wipe cabinets with deglosser.
- Apply two thin coats of paint with a foam roller.
- Let dry fully between coats (at least 4 hours).
- Reattach new hardware for a finished look.
A gallon of paint covers most kitchen cabinets. The total cost is $60–$100 — and the result looks like a $10,000 renovation.
11. Create a Coffee or Tea Station
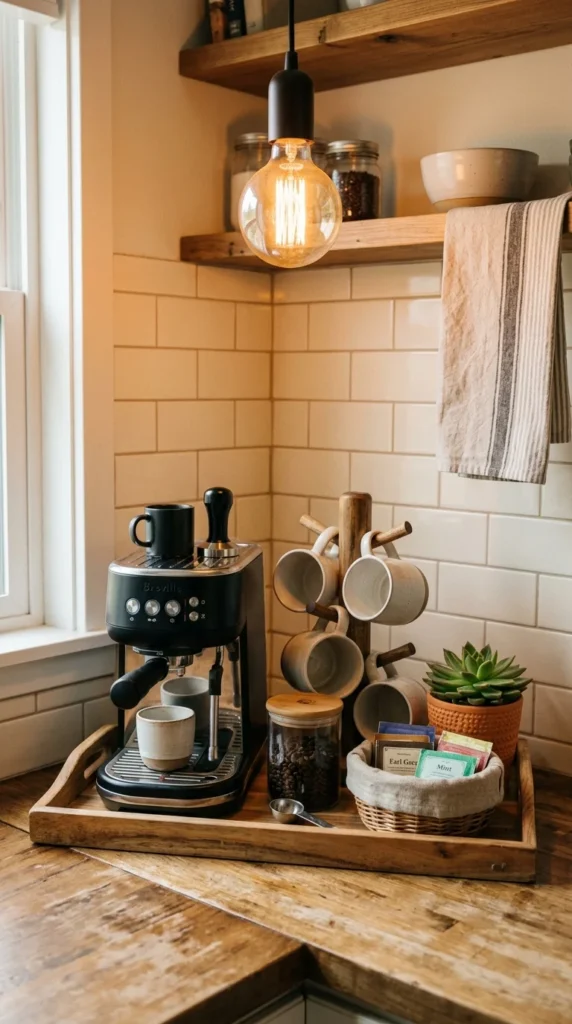
Designating a specific corner of your kitchen for coffee or tea does something magical — it makes the whole space feel curated and purposeful.
A coffee station is part decor, part function, and 100% conversation-worthy.
How to set one up for under $40:
- Use a wooden or marble serving tray as the base ($10–$25 at TJ Maxx or Amazon)
- Add your coffee machine or electric kettle
- Place a ceramic mug tree or a small basket to hold mugs
- Use glass canisters for coffee beans, sugar, or tea bags
- Add one small plant or a mini candle for warmth
Keep it edited — 5–7 items maximum. Too much clutter defeats the purpose.
What to include:
- Coffee machine or French press
- Small airtight canister for beans or grounds
- Mug tree or hooks on the underside of a shelf
- A small linen pouch or basket for pods
- One pretty mug for display
You can dedicate a full countertop section or use the top of a small cart or bookshelf. Even a single IKEA RÅSKOG cart ($35) becomes a fully functional, stylish coffee station on wheels.
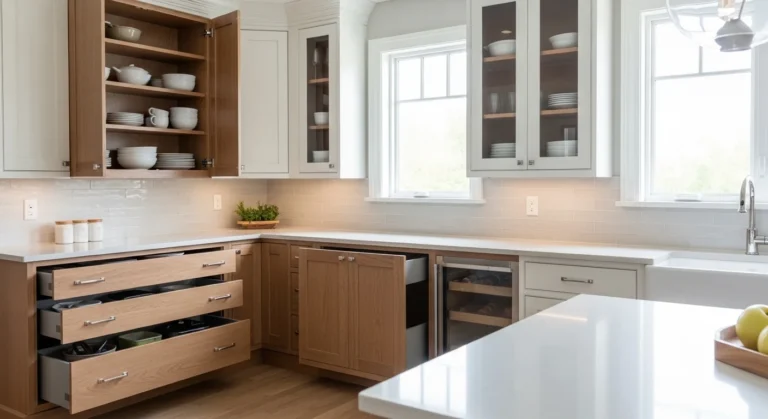
12. Use Matching Storage Containers
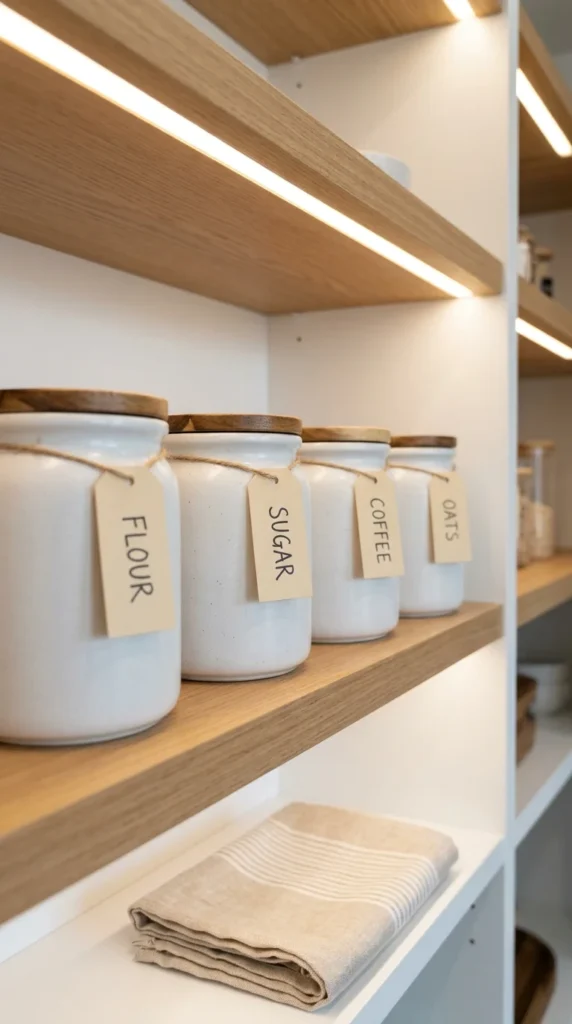
Mismatched containers are one of the biggest sources of visual chaos in a kitchen. Random bags, half-open boxes, and plastic tubs make shelves and counters look cluttered even when they’re technically organized.
Switching to matching containers is a game-changer — and it costs less than you think.
Best options:
- IKEA 365+ glass jars with lids: $3–$8 each
- Amazon Basics canister set (set of 4): $25–$40
- OXO Pop containers (airtight, stackable): $40–$60 for a starter set
- Simple white ceramic canisters from TJ Maxx: $15–$30 for a set
What to decant into matching containers:
- Flour, sugar, oats, rice, pasta
- Coffee beans or grounds
- Snacks and crackers
- Nuts, seeds, and dried fruit
Add simple handwritten labels using a chalkboard marker or kraft paper tags and twine. This adds warmth and makes everything findable at a glance.
The psychological effect of visual uniformity is huge. When containers match, your brain reads the space as clean and organized — even if the contents are the same old groceries.
This is affordable, practical, and one of the most satisfying upgrades you can do on a quiet Saturday afternoon.
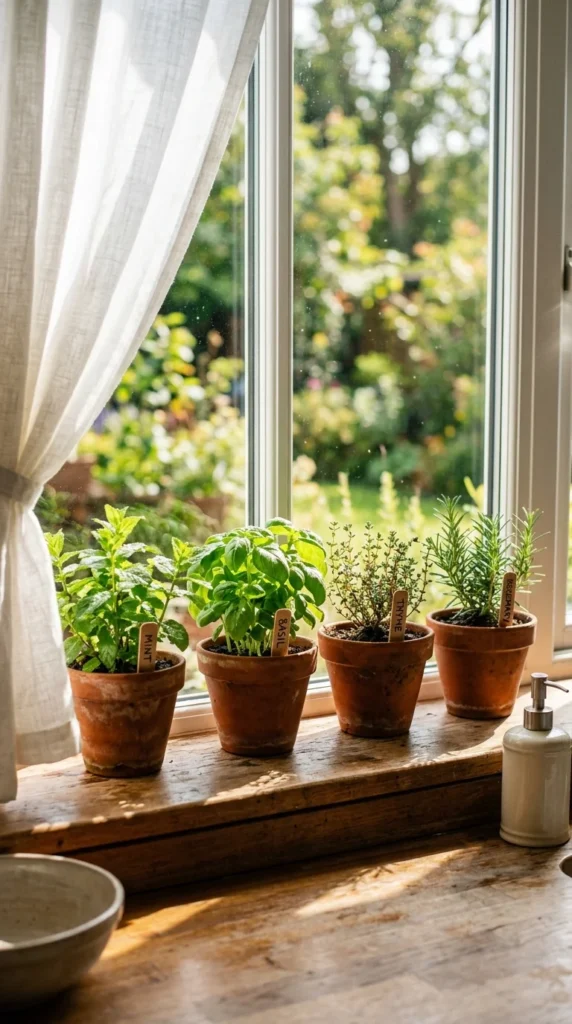
13. Hang Artwork or a Chalkboard Wall Panel
Kitchens don’t need to be purely functional spaces. A single piece of artwork or a well-placed chalkboard makes a kitchen feel like an actual room — not just an appliance storage area.
Artwork ideas that work well in kitchens:
- Botanical prints (herbs, vegetables, florals)
- Food-related illustrations (vintage fruit, coffee, bread)
- Abstract prints in earthy tones
- Black and white photography of markets or farms
Where to find affordable art:
- Etsy digital downloads (print at home for $2–$8)
- IKEA BILD series: $5–$25 per print
- Thrift stores: frames + your own prints for under $15 total
- Society6 or Minted for original artist prints
Alternatively, hang a chalkboard panel. It’s functional (grocery lists, weekly menus, kid’s artwork) and adds a casual, French-bistro charm to the wall.
Frame options:
- Simple black frame from IKEA RIBBA series: $6–$15
- Thrifted frames spray-painted to match your hardware
- Frameless gallery clips for a minimal look
Hang one large piece rather than multiple small ones — it looks more deliberate and professional. Keep it at eye level, about 57–60 inches from the floor to the center of the artwork.
14. Add Under-Cabinet LED Strip Lights
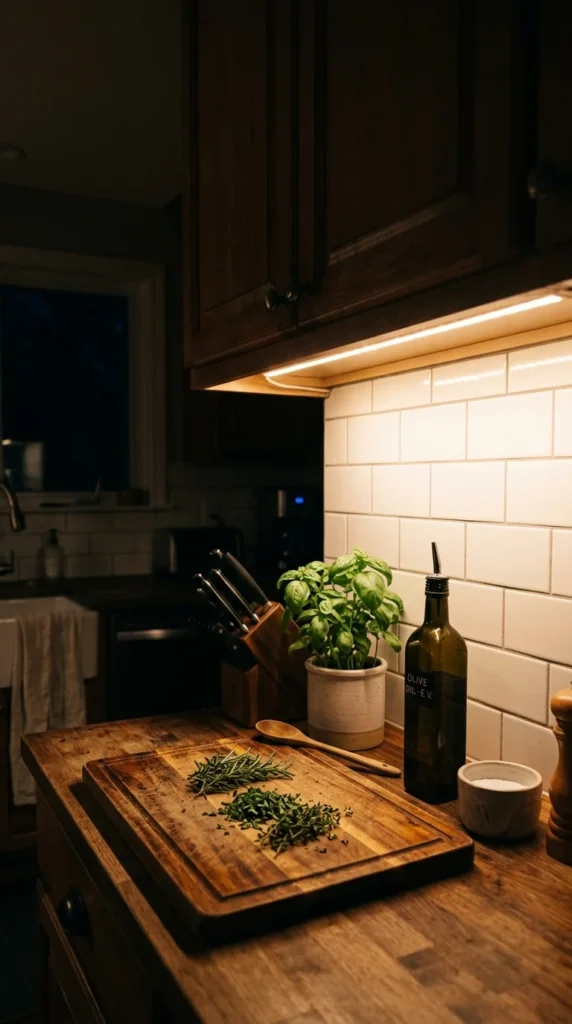
Under-cabinet lighting is the kind of upgrade that immediately makes your kitchen feel like it belongs in a design magazine.
Warm LED strips under your upper cabinets create task lighting, atmosphere, and a high-end look — all for under $30.
What to buy:
- Govee or Lepro LED strip lights (warm white 2700K–3000K): $15–$30 on Amazon
- Look for plug-in versions (no wiring needed)
- Choose adhesive-backed strips that stick directly to the underside of cabinets
How to install:
- Clean the underside of cabinets with a dry cloth.
- Measure the length and cut strips at the designated cut lines.
- Peel and stick the adhesive backing.
- Plug into an outlet inside the cabinet.
- Run the cord discreetly along the cabinet interior.
Choose warm white — never cool blue or color-changing for kitchen ambiance. Cool light makes food look unappetizing and kitchens feel clinical.
The effect on the backsplash and countertop is stunning. It brings out the texture of tile, the grain of wood counters, and the warmth of any stone surface.
Turn off the overhead lights and use only the LED strips while cooking at night. The ambiance is extraordinary.
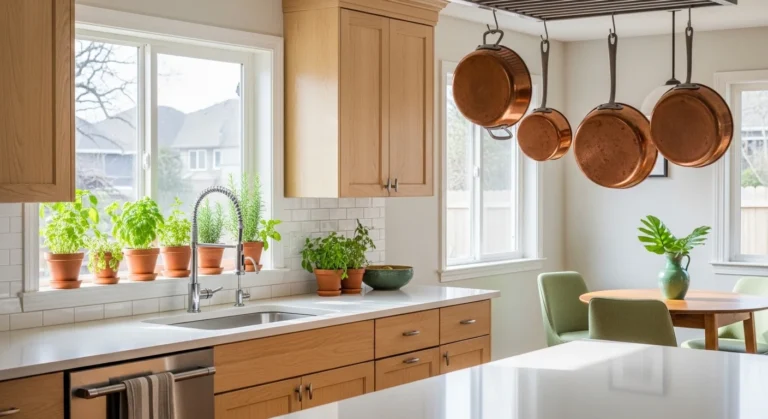
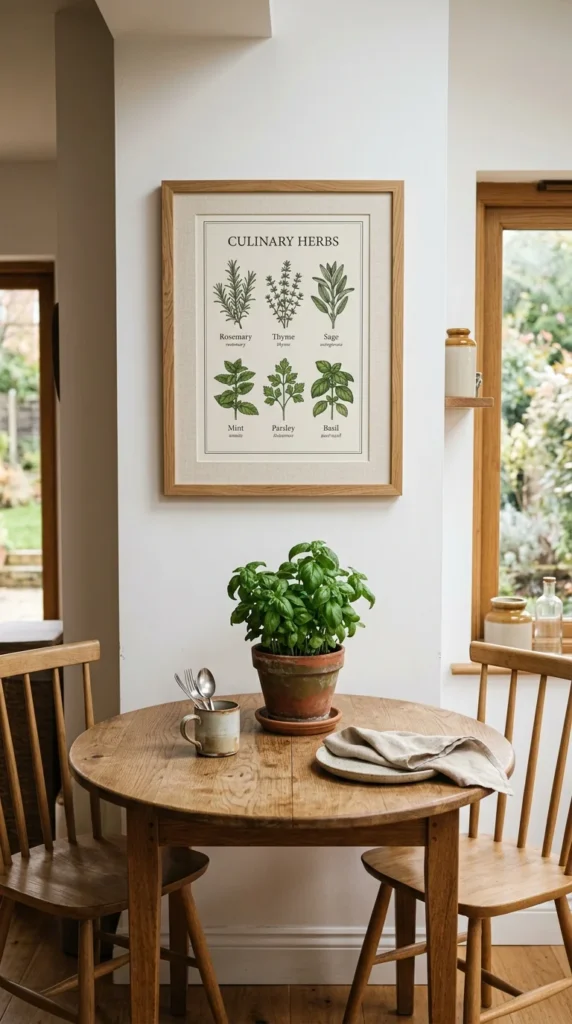
15. Style Your Window Sill as a Herb Garden
A kitchen window sill herb garden is one of those upgrades that looks beautiful, smells incredible, and is genuinely useful while cooking.
Fresh herbs in terracotta pots turn a plain window into a living piece of decor.
Best herbs for kitchen window sills:
- Basil (needs the most sun — south-facing windows)
- Rosemary (drought-tolerant, fragrant)
- Thyme (compact, low maintenance)
- Mint (grows fast — keep in its own pot or it spreads)
- Chives (thin, elegant, and great in eggs)
How to set it up on a budget:
- Buy small herb starter plants from a grocery store or nursery: $2–$4 each
- Use terracotta pots (3–4 inch): $1–$3 each at Home Depot
- Add a saucer under each pot to protect the sill
- Use a small bag of indoor potting mix: $5–$8
Arrange them by height — tallest at the back, shortest in front. Keep 3–5 pots maximum so the sill doesn’t feel overloaded.
The total cost for a 4-pot herb garden: under $20. The payoff in freshness, scent, and visual beauty is enormous — and you’ll actually use what you grow.
16. Replace a Dated Faucet
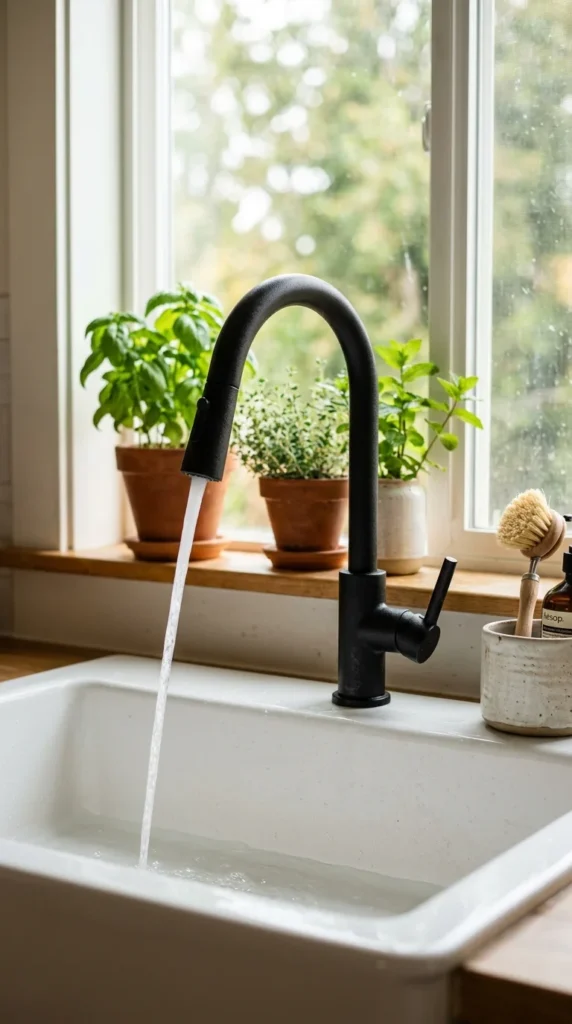
The faucet is one of the most-used objects in your entire kitchen. It’s also one that people rarely think to replace — even when it’s visually dragging the whole room down.
Swapping a dated chrome faucet for a matte black or brushed gold model costs $60–$150 and takes about an hour.
This is the kind of upgrade plumbers charge $200+ for in labor alone — but it’s genuinely DIY-able with basic tools.
What you need:
- Adjustable wrench
- Plumber’s tape
- New faucet (with supply lines usually included)
- Bucket or towels for water drips
Steps:
- Turn off the water supply valves under the sink.
- Disconnect the old supply lines and remove the old faucet.
- Install the new faucet following the included instructions.
- Reconnect supply lines and turn water back on.
- Test for leaks.
Best faucets under $100:
- Moen Adler pull-down: $70–$90
- Delta Essa pull-down: $100–$130
- Friho matte black single-handle: $50–$75 on Amazon
Choose a finish that matches your cabinet hardware. A new faucet tied to your other metal finishes makes the whole kitchen feel cohesive and considered.
17. Use Decorative Dish Towels as Decor
Dish towels are one of the smallest, cheapest, and most underrated styling tools in a kitchen.
A beautiful towel draped over an oven handle or laid flat on a counter instantly adds color, texture, and warmth — with zero effort and minimal cost.
What to look for in styling towels:
- Natural cotton or linen material (hangs and drapes beautifully)
- Simple stripes, checks, or embroidered details
- Colors that pull from your kitchen palette
Where to buy:
- IKEA TEKLA or TIMVISARE: $2–$5 each
- World Market: $4–$8 each
- Target Threshold linen towels: $6–$10 each
- Etsy for handmade/embroidered options: $8–$15
How to style them:
- Drape one through the oven handle loop
- Fold one neatly on the counter beside the sink
- Layer two in different but coordinating patterns
- Hang on a small hook beside the stove
Change them seasonally for an easy, inexpensive refresh. Terracotta and rust tones for fall. Sage and cream for spring.
This is a $10–$20 investment that adds so much warmth and personality. It’s the kind of small thing great kitchen stylists always notice — and now you will too.
18. Organize With a Pegboard Wall Panel
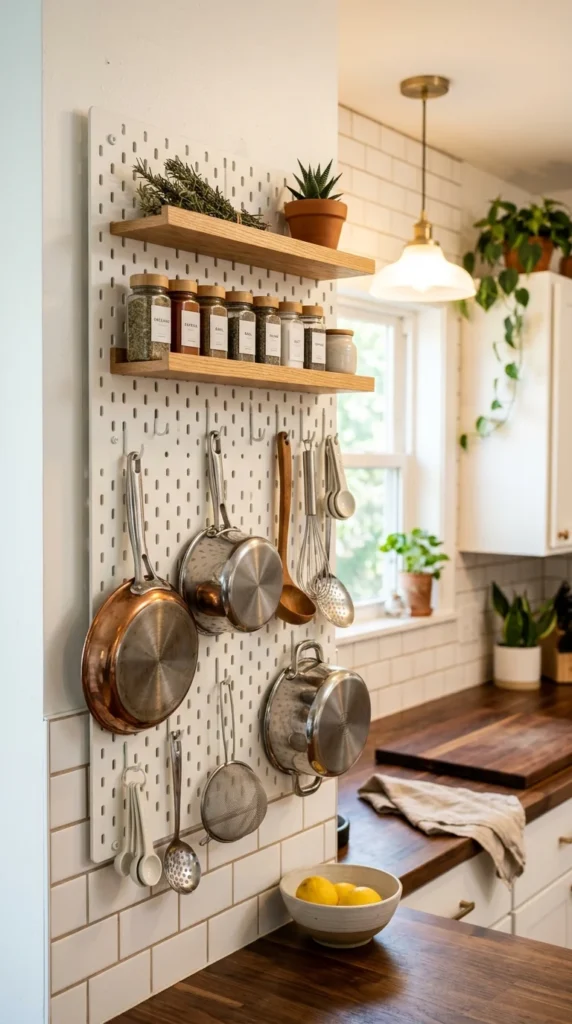
A pegboard is one of the most functional and visually interesting additions you can make to a kitchen — especially if you’re short on cabinet space.
A painted pegboard panel turns an empty wall into organized, accessible storage that actually looks good.
What to buy:
- Standard 2×4 ft pegboard panel from Home Depot: $10–$15
- Pegboard hook kit (variety pack): $8–$15 on Amazon
- Spray paint in white, black, or sage green to color the board first
How to mount it:
- Attach 1×2 inch furring strips to the back of the board (creates space for hooks).
- Mount the furring strips into wall studs.
- Hang the pegboard over them.
What to hang on it:
- Pots and pans (use J-hooks for handles)
- Utensils (ladles, spatulas, tongs)
- Small shelves holding spice jars
- A small plant or herb pot in a clip-on holder
- Scissors, measuring cups, or a kitchen timer
The visual effect is part storage system, part gallery wall. It keeps everything you need within arm’s reach while turning a plain wall into a functional design feature.
Total cost: under $40. Time to install: about two hours on a weekend.
19. Add a Woven Basket for Storage and Texture
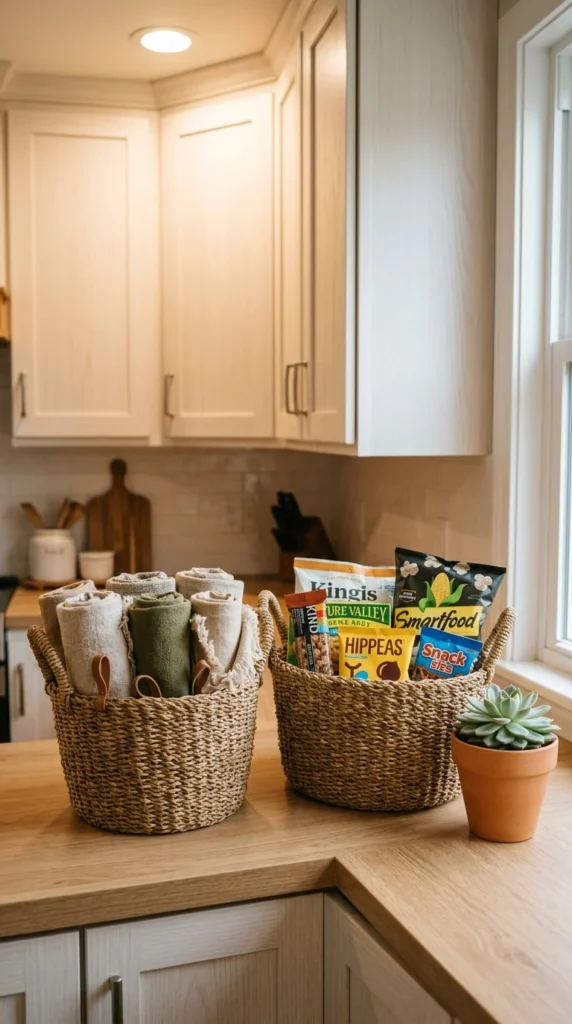
Woven baskets bring in warmth, natural texture, and organic softness that no other material replicates.
A $15–$30 basket does the work of a storage bin while looking ten times more intentional.
Where to use them in a kitchen:
- On a lower open shelf for storing produce (onions, garlic, potatoes)
- On a counter for rolled dish towels
- Inside a cabinet to corral snack bags or spice packets
- On top of the refrigerator for overflow items
- On a kitchen cart as a lower-level storage bin
Best basket styles for kitchens:
- Natural seagrass with handles: $12–$25 at Target or Amazon
- Woven water hyacinth: $15–$30 at World Market
- Simple rattan round baskets (IKEA TOLKNING): $10–$20
Styling tip: Use two or three baskets of the same style in different sizes. Group them together on a shelf or counter for a collected, curated look.
The texture of woven natural fibers adds a softness that balances the hard surfaces — stone, tile, metal, wood — that dominate most kitchens.
It’s one of the simplest, most affordable ways to make a kitchen feel warm, organic, and thoughtfully decorated.
20. Place a Mirror or Reflective Surface Strategically
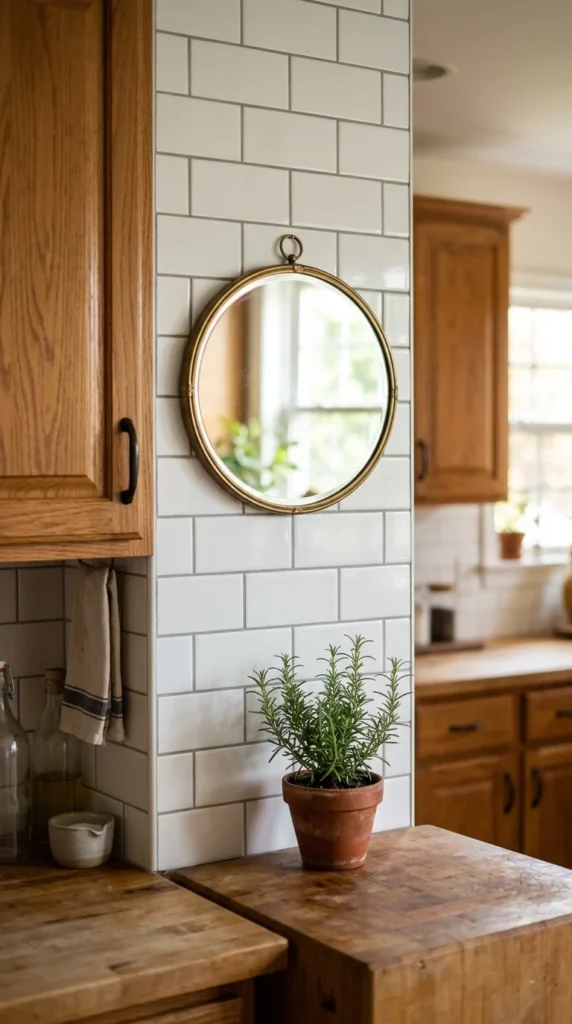
Mirrors in kitchens? Absolutely — and interior designers use this trick constantly.
A small mirror on a kitchen wall reflects light, creates the illusion of more space, and adds a surprising decorative element that most people would never think to put there.
Best mirror styles for kitchens:
- Small round mirrors with thin brass or black frames (12–18 inch diameter)
- Vintage ornate frames picked up from thrift stores ($5–$20)
- Simple arch-shaped mirrors for a modern farmhouse feel
Where to hang them:
- Between two upper cabinets on an empty wall section
- On the wall beside or opposite a window (reflects the most light)
- Above a small open shelf or coffee station
- On a blank backsplash wall in a breakfast nook
What to avoid:
- Mirrors directly above the stove (grease and steam)
- Mirrors that reflect clutter or dirty dishes
- Mirrors so large they feel like a bathroom transplant
A small, well-placed mirror makes your kitchen feel larger, lighter, and more layered. It’s unexpected — and unexpected is almost always more interesting than obvious.
Thrift one for $5–$10, add spray-painted frame if needed, and hang it in under 15 minutes.
21. Switch to Linen or Roman Shades Over the Sink
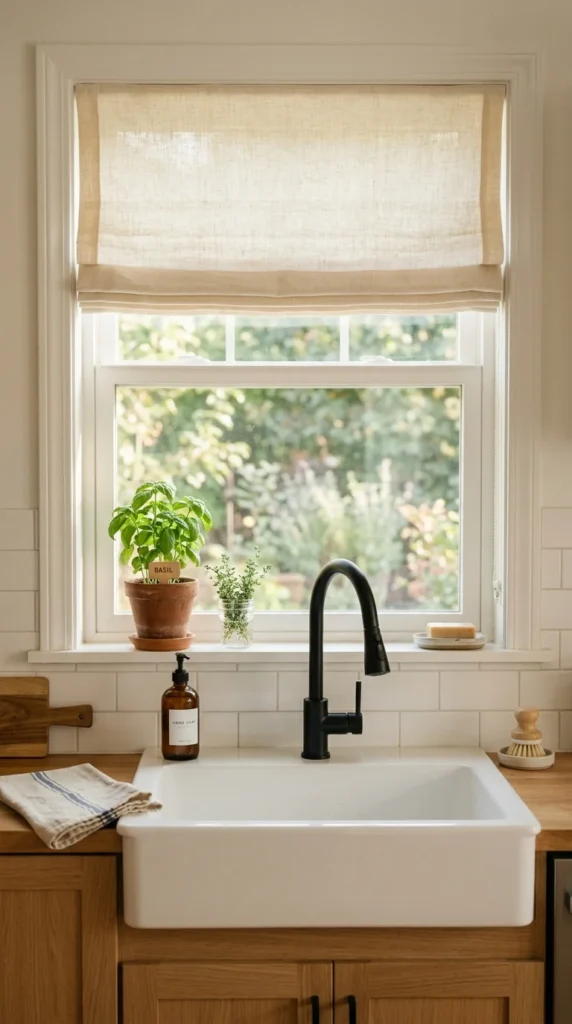
Window treatments are one of the most impactful and most ignored finishing touches in a kitchen.
Replacing plastic venetian blinds or bare windows with a linen Roman shade instantly makes a kitchen feel warmer, softer, and more put-together.
Why Roman shades work so well in kitchens:
- They fold up cleanly when raised — no floppy fabric
- Linen fabric filters light beautifully (warm and diffused)
- They add texture to what is usually a hard, shiny space
- They come in cordless versions (safer and cleaner-looking)
Where to buy affordable options:
- IKEA RINGBLOMMA cotton Roman blind: $15–$30
- Amazon cordless linen shades: $25–$50
- Target or Home Depot: $30–$70 depending on size
Best colors for kitchens:
- Natural linen (warm and neutral)
- Soft white or cream (brightening and clean)
- Sage or dusty green (organic and cozy)
- Warm sand or taupe (earthy and grounding)
Hang the rod slightly higher and wider than the actual window frame. This makes the window look larger and lets in more light when the shade is raised.
It’s a finishing touch that ties together everything else you’ve done — and it makes the whole kitchen feel complete.
Conclusion
You don’t need a big budget or a contractor to make your kitchen look completely different. These 21 hacks prove that smart, small changes — new hardware, a runner rug, matching containers, a pendant light, a well-styled counter — add up to a space that feels genuinely transformed. Start with one or two ideas that fit your current budget and space. Style a shelf. Paint the inside of a cabinet. Hang a magnetic knife strip. Each small change builds on the next, and before long, your kitchen becomes one of your favorite rooms in the home — not because you spent a fortune, but because you paid attention to the details that actually matter.