19 Gorgeous Wall Decor Ideas That Make Any Room Look Expensive
Your walls are the largest canvas in your home — and most people leave them completely blank. That’s a missed opportunity. The right wall decor doesn’t just fill space; it sets a mood, tells a story, and makes the whole room feel pulled together. The good news? You don’t need a designer’s budget to get a designer’s result. Whether you’re renting a tiny apartment or finally decorating your dream home, these 19 ideas will help you create walls that look like they belong in a magazine — without the price tag that usually comes with it.
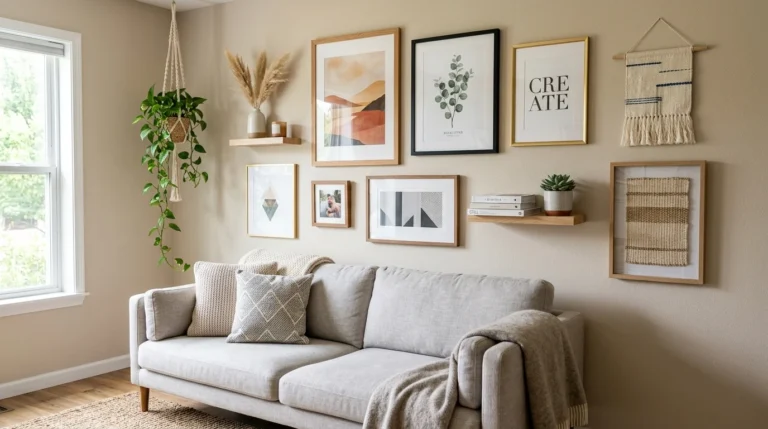
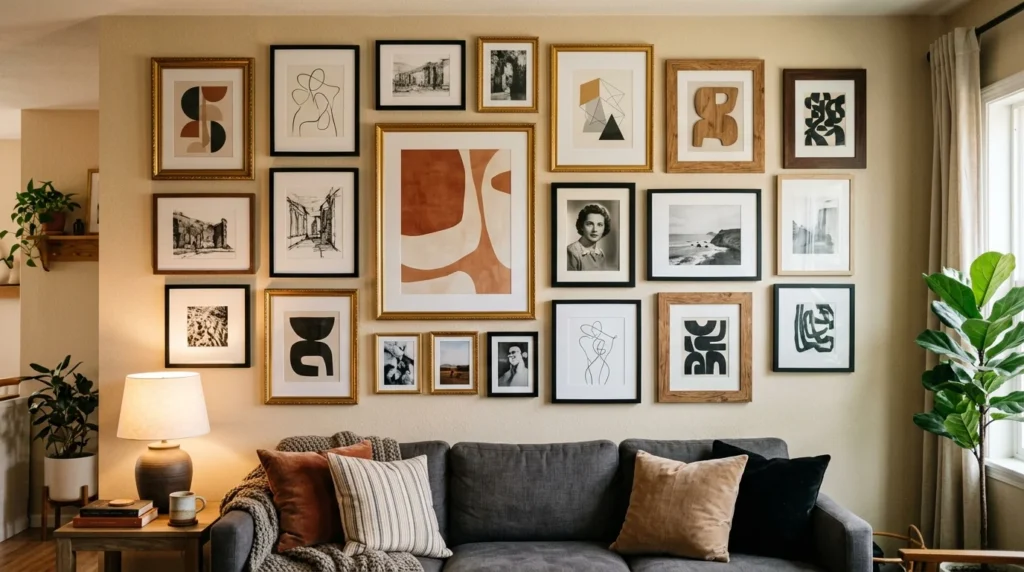
1. Create a Gallery Wall With Thrifted Frames
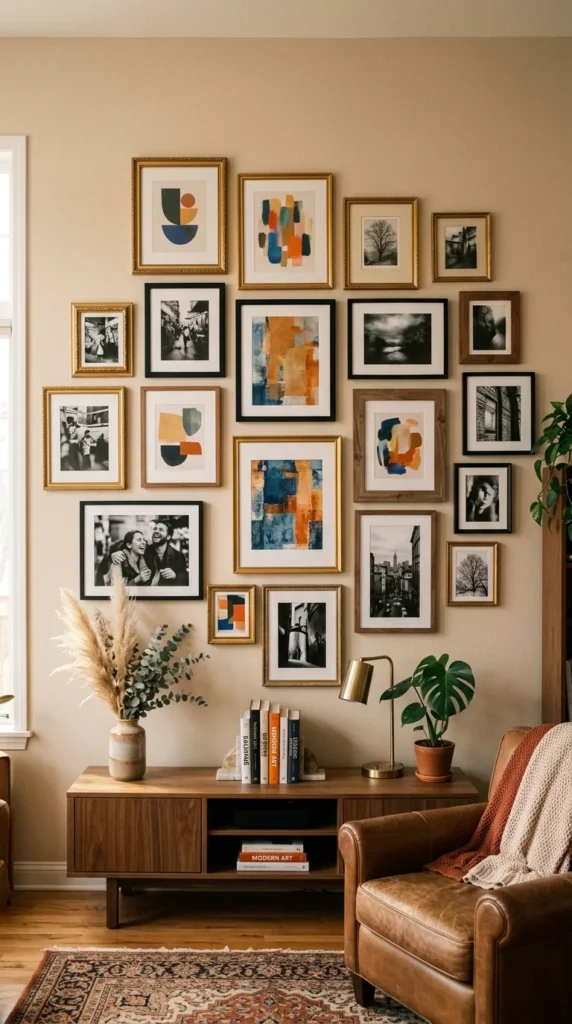
A gallery wall is one of the fastest ways to make a room look curated and intentional.
The secret? Matching your frames matters more than matching your art.
Pick one or two frame finishes — like all black or all gold — and mix the sizes freely. This creates a collected, layered look that feels personal rather than staged.
You don’t need to spend money on art. Print free public domain images from sites like Unsplash or the Rijksmuseum collection. Frame a meaningful quote in a clean font. Use postcards, maps, or pages torn from old coffee table books.
Start by laying your frames on the floor before hanging anything. Arrange them until the grouping feels balanced. Take a photo on your phone so you can reference it while hammering nails.
Budget tip: Check thrift stores and Facebook Marketplace for frames. A $2 frame with a fresh coat of spray paint looks completely different.
Aim for a mix of horizontal and vertical orientations. Leave 2–3 inches between each frame for breathing room. The whole project can cost under $30 and takes an afternoon to put together.
2. Hang a Large-Scale Tapestry
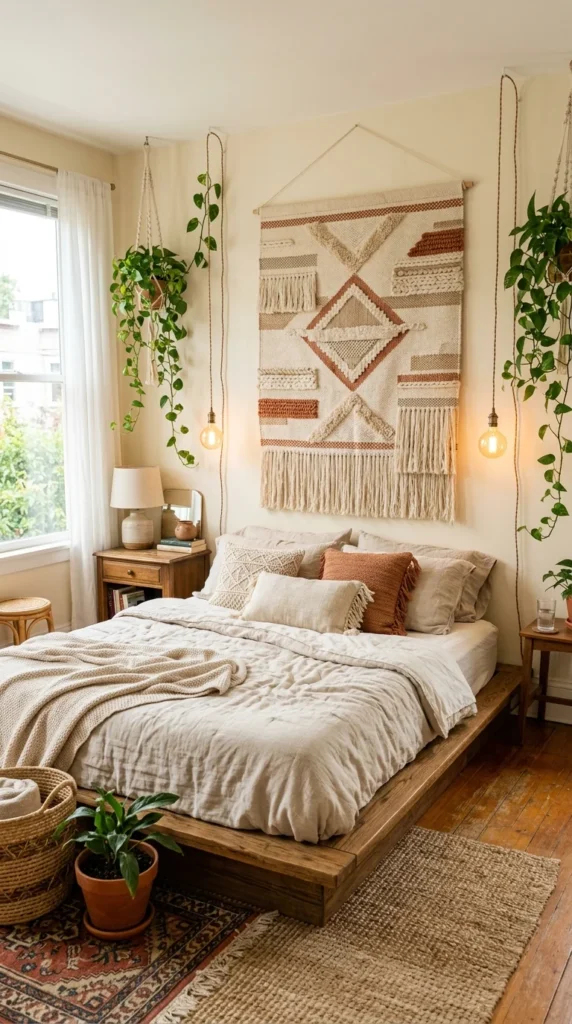
A single oversized tapestry can do what ten smaller pieces can’t — it anchors the room and makes a bold statement instantly.
Tapestries work in almost any style. Woven, macramé, printed fabric, or vintage kilim rugs all work beautifully hung on a wall.
The easiest hanging method is a wooden dowel. Thread the tapestry over the rod and hang it from two small hooks or nails. This takes about ten minutes and leaves minimal wall damage — perfect for renters.
Tapestries are especially useful in rooms with awkward proportions. A large tapestry behind a bed replaces the need for an expensive headboard. In a living room, it adds warmth and texture to a bare wall.
Where to shop affordably: Etsy has hundreds of handmade options under $50. IKEA occasionally carries simple woven wall hangings. Thrift stores sometimes stock vintage textile pieces that are genuinely one-of-a-kind.
Choose a tapestry that picks up at least one color already in the room. That connection makes the whole space feel intentional.
Size up when in doubt. A tapestry that fills most of the wall always looks more expensive than one that gets lost in the middle.
3. Mount a Single Oversized Mirror
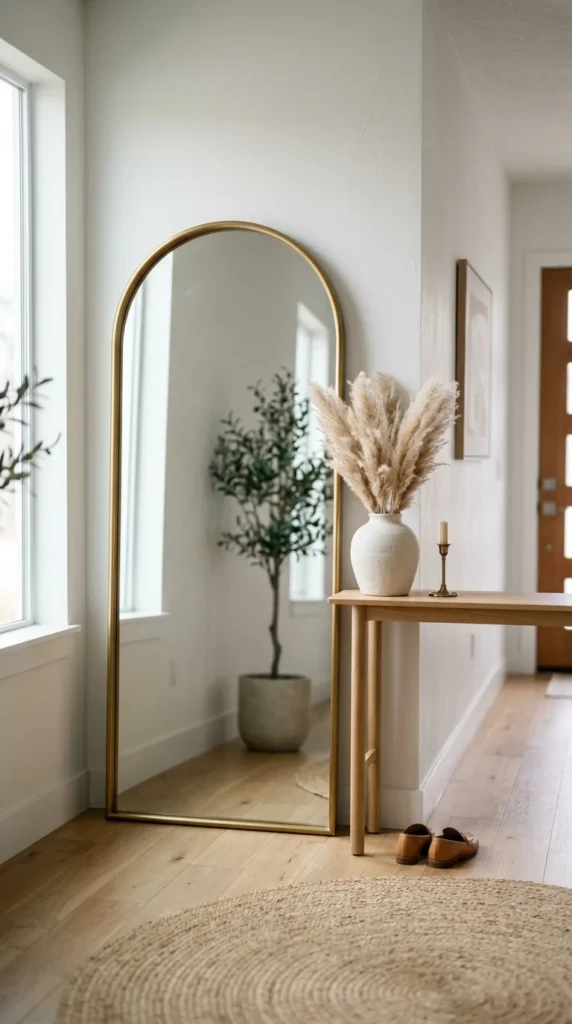
Mirrors are one of the oldest tricks in interior design — and they still work every single time.
A large mirror makes a room feel bigger, brighter, and more open. It reflects light, bounces it around the room, and adds depth that no painting can replicate.
The key is going big. A small or medium mirror on a large wall looks like an afterthought. An oversized mirror — ideally at least 36 inches tall — looks intentional and architectural.
Arched mirrors are especially popular right now because they soften the hard lines in a room. Lean one against the wall instead of hanging it for an effortless, editorial look.
You don’t need to spend hundreds. IKEA’s HOVET and NISSEDAL mirrors are under $100 and look significantly more expensive in person. Thrift stores frequently carry large mirrors — buy one and spray paint the frame in gold, black, or white.
Placement matters: Hang or lean a mirror across from a window to maximize light reflection. In a dining room, a large mirror across from the table makes the space feel twice as grand.
Add a few small objects in front of a leaning mirror — a plant, a candle, a small sculpture — and it instantly becomes a styled vignette.
4. Install Floating Shelves and Style Them Intentionally
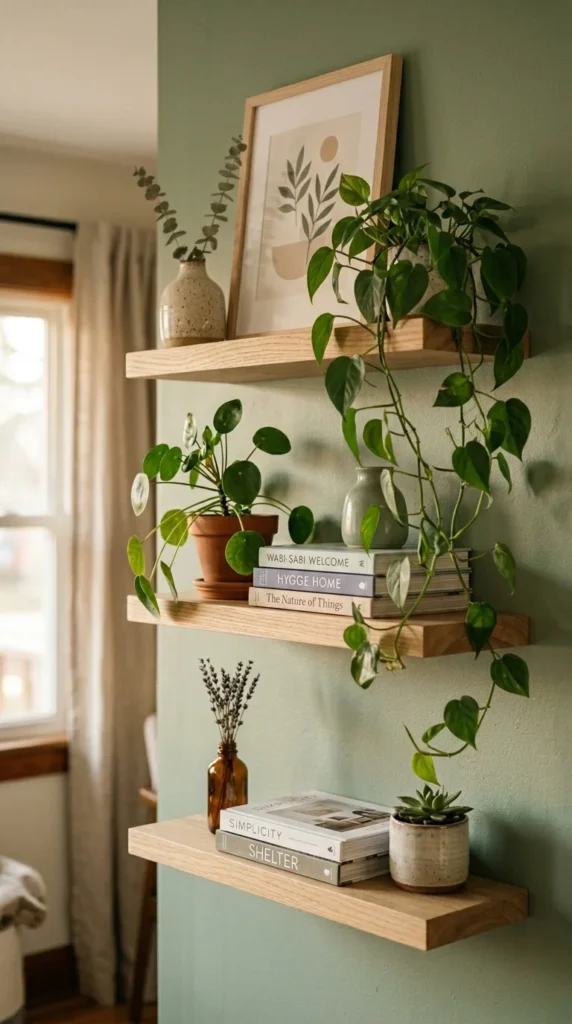
Floating shelves solve two problems at once: they add wall decor AND give you functional storage.
The styling is where most people go wrong. Don’t just pile things on. Think in groupings of three. Mix heights — tall vase, short candle, medium plant. Vary textures — smooth ceramic, rough woven basket, glossy book cover.
Leave some empty space on each shelf. That negative space is what makes the styling look deliberate rather than cluttered.
What to display:
- A small trailing plant like pothos or string of pearls
- A few hardback books stacked horizontally (remove the dust jackets for a cleaner look)
- One or two ceramic or clay objects
- A small framed photo or print leaning against the wall
IKEA’s LACK shelves are under $10 each and hold up beautifully. Floating shelves from Amazon start around $20–30 for a set. For a warmer look, try solid wood floating shelves from a local lumber yard — they’re often cheaper than you’d expect.
Paint the wall behind the shelves a contrasting color to make the whole display pop.
Change the styling seasonally. Swap out a few objects every few months and the shelves always feel current.
5. Use Removable Wallpaper as an Accent Wall
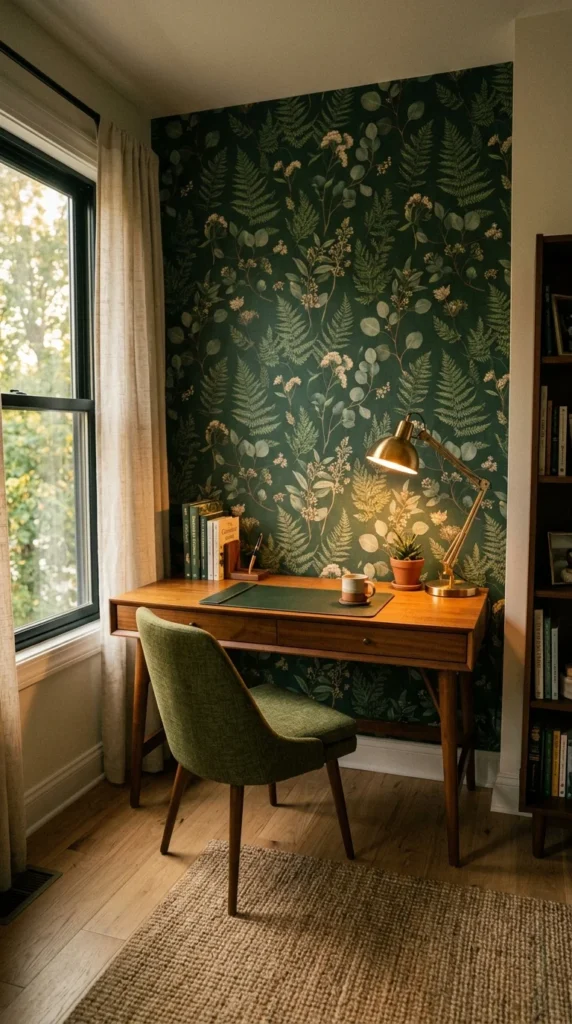
An accent wall changes everything — and removable wallpaper makes it renter-friendly.
One patterned wall transforms a room from flat and forgettable to layered and intentional. It frames furniture, adds depth, and creates a focal point the eye is naturally drawn to.
Removable wallpaper (also called peel-and-stick) has improved dramatically. Modern versions go up smoothly, come down cleanly, and look virtually identical to traditional wallpaper.
Popular choices that photograph beautifully:
- Vintage botanical prints
- Subtle geometric patterns
- Linen or grasscloth textures
- Deep jewel-tone solid textures
Budget math: A standard accent wall (roughly 12 x 9 feet) needs about 6–8 rolls. Most peel-and-stick options run $25–45 per roll. Brands like Chasing Paper, Spoonflower, and TEMPAPER are widely trusted.
Apply it to the wall behind your bed, sofa, or dining table for maximum impact. Those are the walls that anchor the furniture grouping and do the most visual work.
Watch a few YouTube tutorials before starting. The main skill is keeping each panel perfectly level — a $5 laser level from Amazon makes this very easy.
6. Frame Fabric or Wallpaper Samples
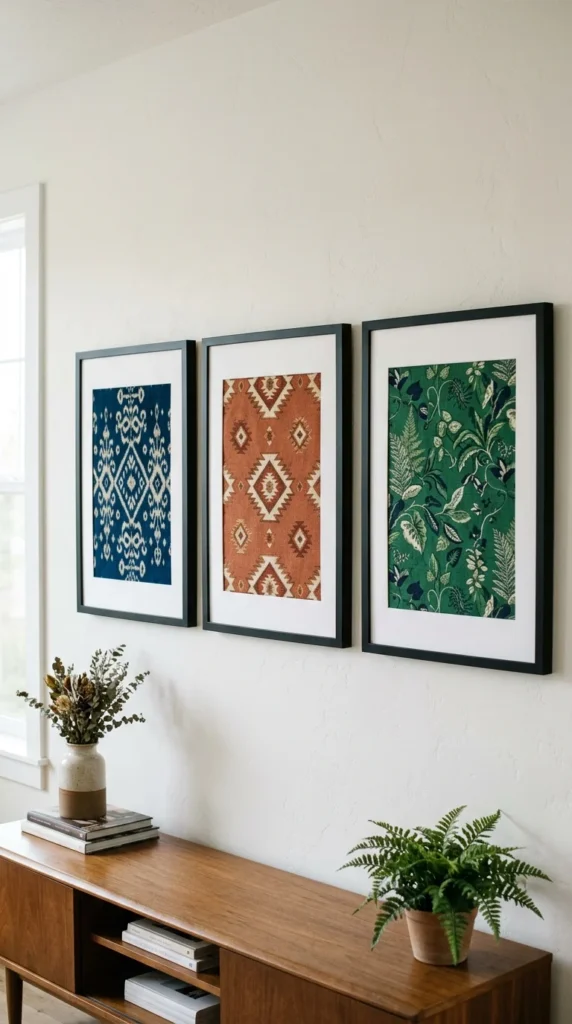
This is one of the most underrated DIY wall art tricks — and it looks far more expensive than it costs.
Buy a fabric sample or a piece of patterned wallpaper. Cut it to size. Frame it. Done.
The result looks like custom textile art. Pattern, color, and texture do all the heavy lifting — and you’re spending maybe $10–20 total per piece.
Where to source materials:
- Fabric remnants from Joann or your local fabric store
- Discontinued wallpaper samples (often free or heavily discounted at hardware stores)
- Decorative wrapping paper from TJ Maxx or HomeGoods
- Indian block-print fabric from Etsy (often very affordable)
Use the same frame style across all three pieces for a cohesive, intentional display. Matching frames in a series always look more expensive than mismatched ones.
This works especially well in a dining room, bedroom, or entryway where you want something bold but not too busy.
Pro tip: Choose a fabric that picks up the dominant color in your room. If your sofa is deep green, a botanical print in green tones will tie everything together beautifully.
Change the fabric seasonally for an entirely different look using the same frames.
7. Hang Woven Baskets in a Cluster

Basket wall arrangements are everywhere in high-end interiors — and they’re surprisingly affordable to recreate.
The look is warm, textural, and dimensional. Unlike flat art, baskets add actual depth to a wall.
How to arrange them: Start with your largest basket in the center or slightly off-center. Work outward in an organic cluster, mixing round and oval shapes. Vary the weave patterns and natural tones — some tight, some open-weave, some with dark banding.
Most baskets come with a small loop on the back for hanging. If not, use a sawtooth hanger or a small nail through the weave.
Where to buy affordably:
- TJ Maxx and HomeGoods always have rotating stock
- World Market carries beautiful options at fair prices
- Thrift stores frequently have wicker and rattan baskets
- IKEA and Target both carry decent basic options
Aim for 5–9 baskets for a full, gallery-style arrangement. Fewer than five can look sparse on a large wall.
This works particularly well in a living room, dining area, or bedroom. It adds warmth and texture that you can’t get from a print or painting.
Budget tip: Start with two or three baskets and add over time. A gradual build looks more collected and personal anyway.
8. Paint a Simple Mural or Geometric Shape
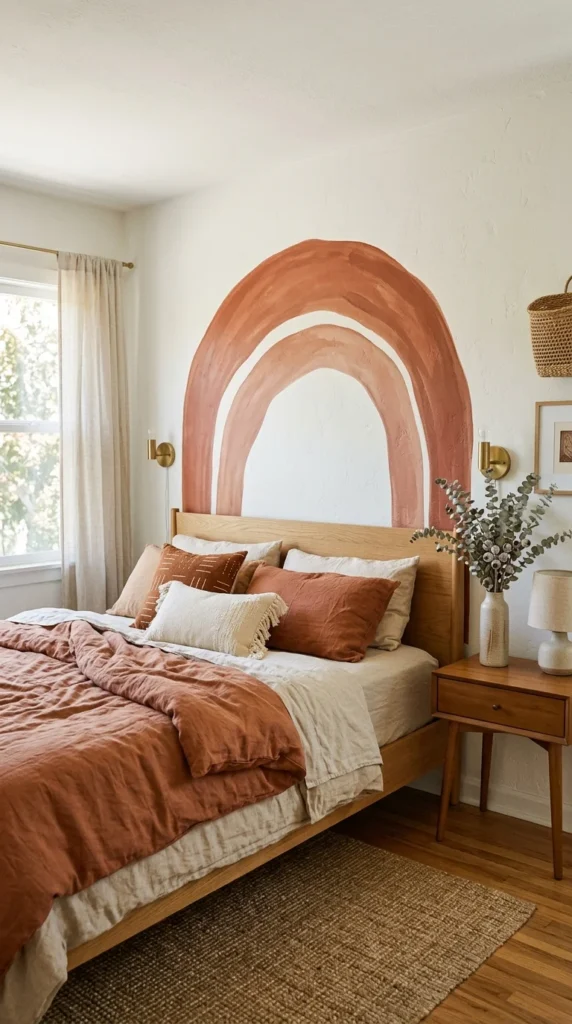
You don’t have to be an artist to paint a mural. The most popular DIY murals use simple shapes — arches, curved lines, color blocks.
The half-wall arch is the most beginner-friendly. Use a pencil and a piece of string as a compass to draw the arch. Tape it off carefully. Roll on your chosen color. That’s it.
This single shape behind a bed or sofa creates a dramatic focal point that looks architecturally designed.
Other easy mural ideas:
- A wide color block stripe across the top third of the wall
- A large circle or half-circle in a contrasting color
- Abstract wavy lines in two complementary tones
Paint you’ll need: One quart of paint is more than enough for most simple shapes. That’s typically under $15. Use a sample pot for even smaller shapes.
Tape is your best friend here. Frog Tape (the green kind) gives the cleanest lines and is worth the slightly higher price.
If you’re nervous, practice the shape on paper first. Then transfer it lightly to the wall with a pencil before committing with paint.
Color tip: A deep terracotta, sage green, or dusty blue arch against an off-white wall looks striking and current without being trendy.
9. Display Vintage Plates in a Curated Arrangement
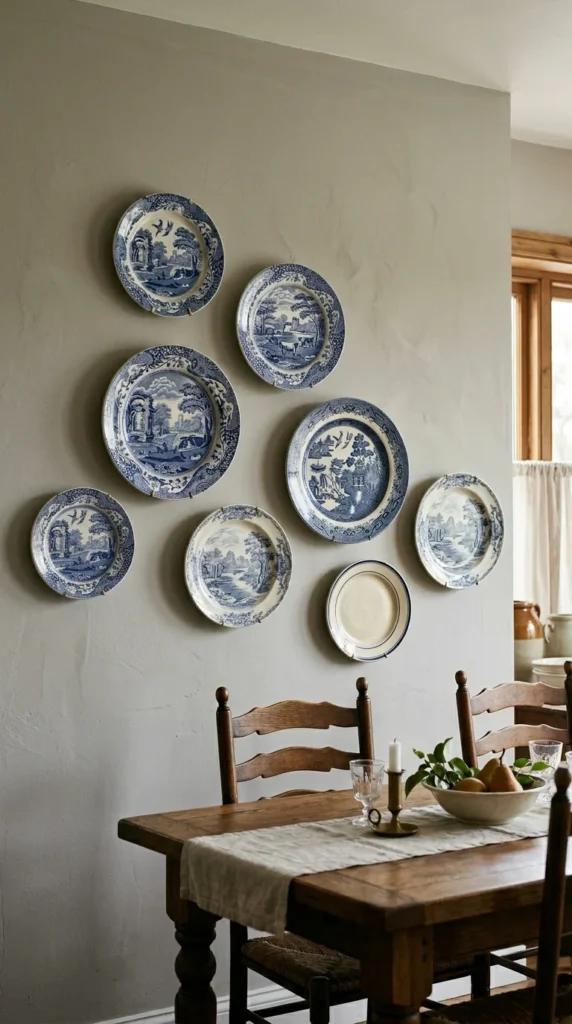
Plate walls have made a massive comeback — and done right, they look genuinely elegant.
The key is curation, not collection. Choose plates with a common thread: all blue-and-white, all a similar era, all with floral motifs. That cohesion is what separates a styled plate wall from a random pile.
Where to find vintage plates affordably:
- Thrift stores (Goodwill, Salvation Army)
- Estate sales and flea markets
- eBay and Etsy for specific patterns
- Your grandmother’s cabinet (ask nicely)
How to hang them: Adhesive plate hangers (the spring-loaded wire kind) work on almost every plate without drilling. They’re under $1 each and leave no damage. Look for them at craft stores or Amazon.
Arrange plates on the floor first. Take a photo. Use paper templates cut to size to test the layout on the wall before committing.
Composition tip: Mix a few larger statement plates (10–12 inches) with smaller ones (6–8 inches). This variation of scale is what makes the arrangement feel dynamic rather than flat.
A plate wall works beautifully in a dining room, kitchen, or living room. It brings history, character, and warmth that no mass-produced print can replicate.
10. Add Architectural Interest With Wall Molding
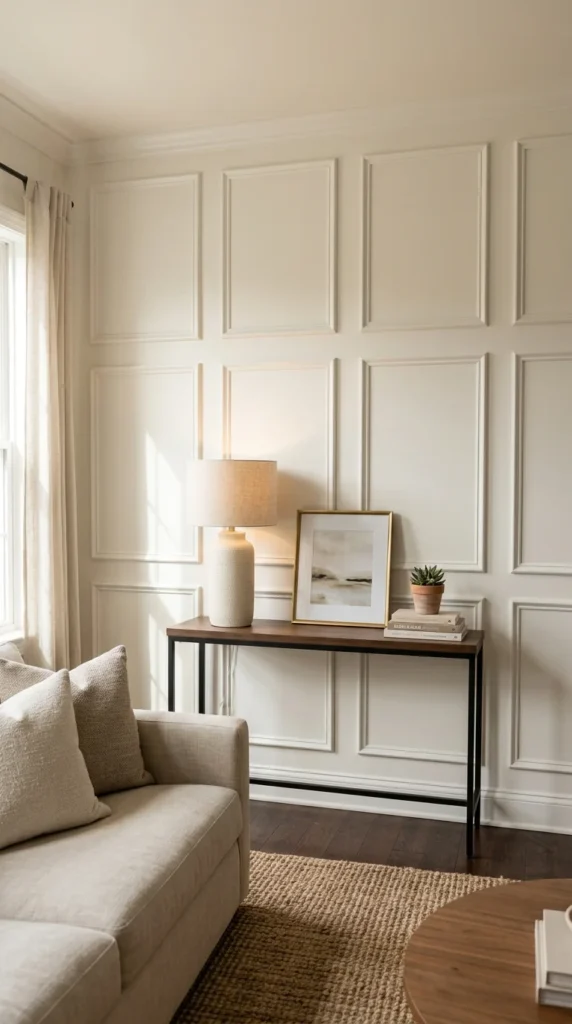
Wall molding is one of the most transformative — and most underestimated — wall decor techniques.
It makes plain drywall look like a custom-built home from a magazine.
The most popular style is picture frame molding. This involves attaching thin strips of wood trim to the wall in rectangular panels. The result looks like wainscoting or paneling — architectural details that normally cost thousands to install professionally.
DIY version: Buy thin wood trim (called chair rail or base cap molding) from a hardware store. Cut pieces to form rectangles. Attach them to the wall with construction adhesive and a few small brad nails. Caulk the edges. Paint the same color as the wall.
Total cost for one wall: typically $40–80 in materials.
The same-color-as-the-wall approach (called “tonal”) is the most sophisticated look. The molding creates shadow and depth rather than color contrast.
Alternatively: Use painters tape to map out the panel design before buying materials. This lets you visualize the spacing before any commitment.
This works brilliantly in a dining room, bedroom, or entryway. Pair it with a chandelier or sconce and the room looks genuinely grand.
11. Hang a Statement Clock
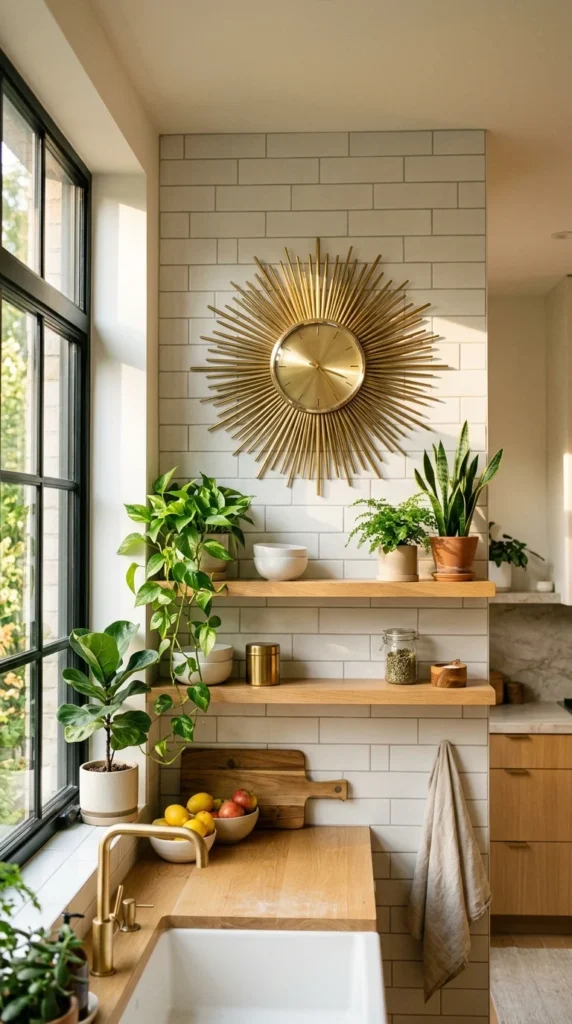
A large wall clock isn’t just functional — it’s a design anchor.
The right clock on the right wall pulls a room together without any additional decoration needed.
Go big. A 20–30 inch clock makes a real statement. Anything smaller tends to look like an afterthought on most walls.
Most popular styles right now:
- Sunburst or starburst in gold or brass — works in mid-century and transitional spaces
- Roman numeral in distressed metal — classic, suits traditional or farmhouse styles
- Minimalist open-face — very modern and clean for contemporary spaces
- Large industrial with visible gears — adds an editorial, eclectic touch
Where to shop affordably: Amazon, Target, and TJ Maxx all carry oversized clocks in the $40–100 range that look significantly more expensive than they are. Kirkland’s and At Home stores (US) often have large clocks on sale.
A clock works well above a sofa, in a kitchen, above a console table in an entryway, or centered on a blank bedroom wall.
Budget tip: If the clock mechanism stops working, keep it on the wall anyway. A beautiful non-working clock is still excellent wall decor.
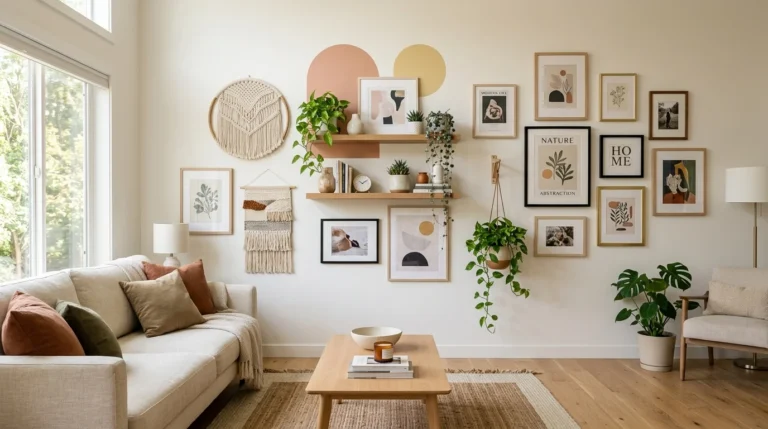
12. Layer Artwork at Different Heights
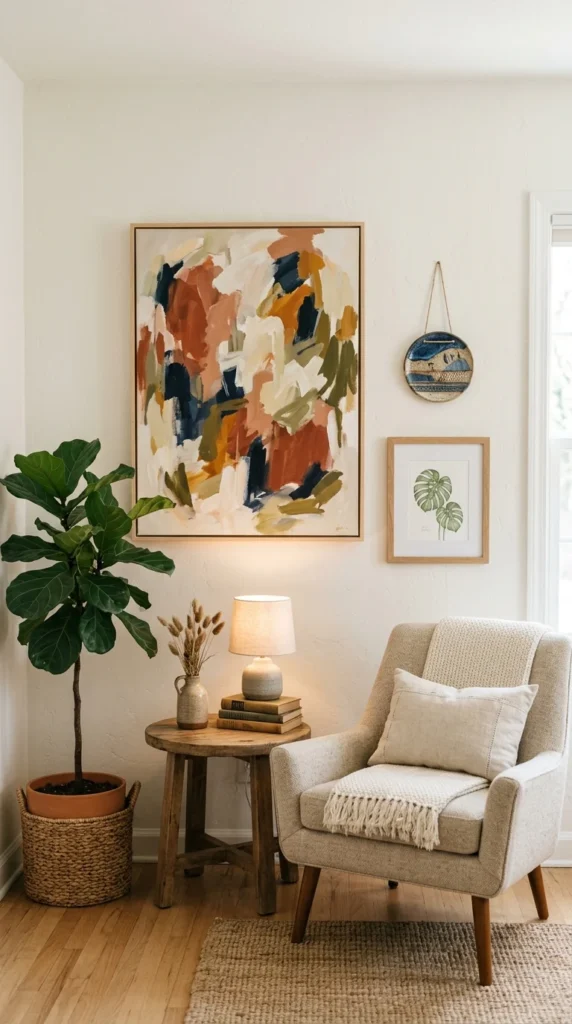
Most people hang all their art at exactly the same height. That rigidity is exactly what makes a room feel flat.
Breaking the grid — hanging pieces at different heights — creates visual rhythm that feels natural and composed.
Think of it like a melody rather than a straight line. Some pieces go high, some lower. The eye travels through them rather than scanning across one row.
How to do it without chaos:
- Keep your largest piece at standard eye level (roughly 57–60 inches from floor to center)
- Hang a smaller piece a few inches lower and to the side
- Add a third piece — a small ceramic wall hanging, a plant shelf, or a mini print — at a third height
The variety of scale matters too. Mix a large canvas with a small framed photo and a medium print. That range of sizes keeps things dynamic.
Start with two pieces if layering feels overwhelming. Hang a large piece, then add one smaller piece below and to the right. That simple asymmetry already looks intentional.
Use picture hanging strips (Command strips) for smaller pieces so you can adjust placement easily without new holes.
The goal is a grouping that looks like it grew naturally over time — not like everything arrived in one flat-pack box.
13. Macramé Wall Hangings for Texture
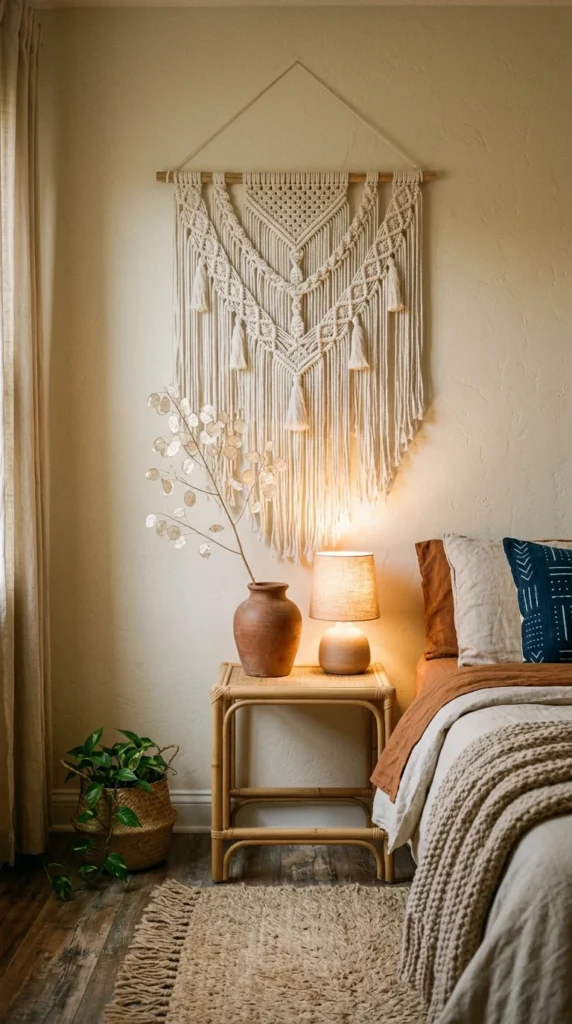
Macramé adds something almost no other wall decor can: actual texture you can feel from across the room.
The layered knots, the fringe, the dimensional quality — it reads as handmade, intentional, and warm.
You don’t need to make it yourself (though that’s a fun weekend project). Handmade macramé is widely available on Etsy for $30–120 depending on size. For a full statement piece above a bed, budget $60–100.
What to look for:
- Natural cotton cord (not synthetic — it doesn’t photograph as well)
- A design with some variation — different knot patterns add visual interest
- Fringe length proportional to your wall height
Hang it using a wooden dowel (often included) and two small nails or hooks.
DIY option: A beginner macramé wall hanging takes 3–4 hours and costs about $15–20 in cord. There are dozens of free tutorials on YouTube for absolute beginners. The basic square knot is the only knot you need to know for a simple but beautiful piece.
Macramé works best in bedrooms, living rooms, and reading nooks. Pair it with warm lighting — a nearby lamp or a strand of Edison bulbs — and the texture becomes even more pronounced.
14. Use Floating Ledges to Display Rotating Art
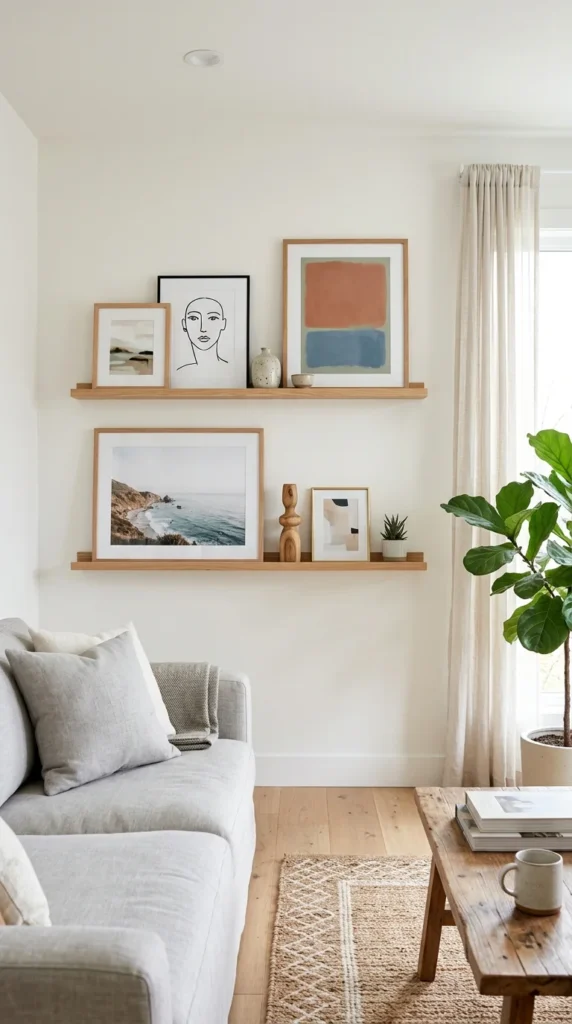
Picture ledges (also called art rails) are the most flexible wall decor solution available.
Unlike traditional hanging, you can change the art anytime without touching a single nail. Just swap pieces in and out as your taste evolves.
IKEA’s MOSSLANDA picture ledge is the most popular option — under $15 per piece and widely used in styled interiors. Install two or three at slightly different heights for a layered, editorial display.
What to put on them:
- Framed prints leaning casually against the wall
- Small unframed canvas panels
- A mix of framed photos, postcards, and art cards
- A small plant or ceramic object tucked between frames
The casual lean is what makes this look so current. Rather than everything hanging precisely level, the slight angle adds a relaxed, lived-in quality.
How many pieces? Aim for 3–5 items per ledge. Some overlapping is fine and actually looks good — it adds depth.
This works especially well in a bedroom above the bed, in a living room above the sofa, or in an entryway above a console table.
Budget tip: Print artwork at home on cardstock. Cut to 5×7 or 8×10. No frame needed on a ledge — a small binder clip at the top adds a graphic, modern touch.
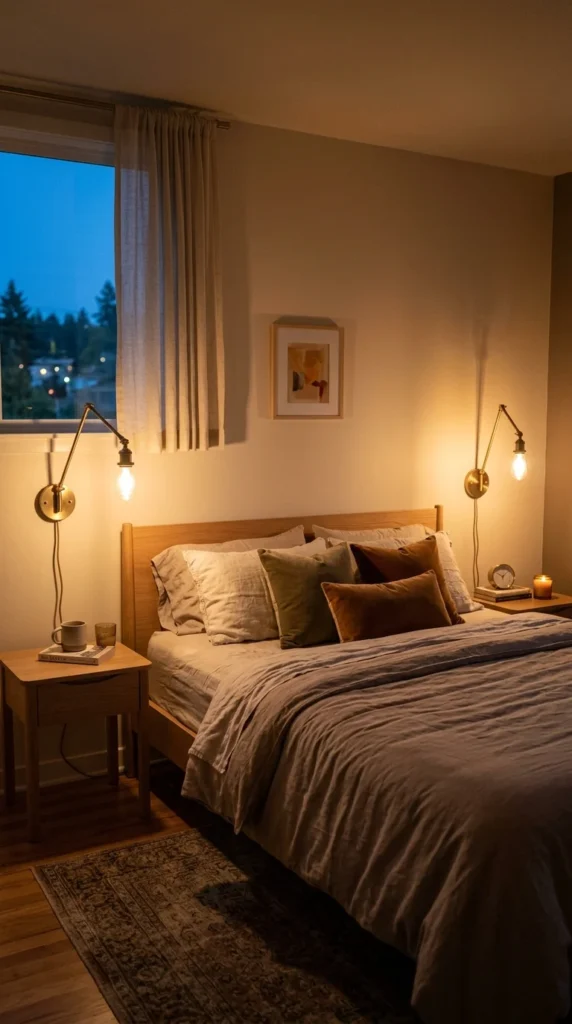
15. Install Wall Sconces for Functional Decor
Lighting is wall decor. People forget this constantly.
Wall sconces add dimension, warmth, and architectural interest to any room — and plug-in versions require no electrical work.
Plug-in sconces have come a long way in design. They look just like hardwired versions; the cord can be run discreetly along the wall or hidden behind furniture. Most cords are 6–8 feet and reach a standard outlet easily.
The best placement:
- Flanking a bed (replaces bedside lamps, frees up nightstand space)
- On either side of a mirror or artwork
- In a reading nook at shoulder height
- Framing a sofa or console table
Popular finishes right now: brushed brass, matte black, antique bronze. Choose one that matches other metal tones already in the room — cabinet handles, faucets, lamp bases.
Where to buy: Amazon, Wayfair, and Lamps Plus all carry plug-in sconces from $30–100. CB2 and West Elm have higher-end options if budget allows.
Pair sconces with warm-toned bulbs (2700K). That warm glow is what makes a room feel like it belongs in an atmospheric hotel suite rather than a standard rental.
Add a dimmer plug between the sconce and the outlet for full ambiance control.
16. Frame Botanical Prints in a Grid
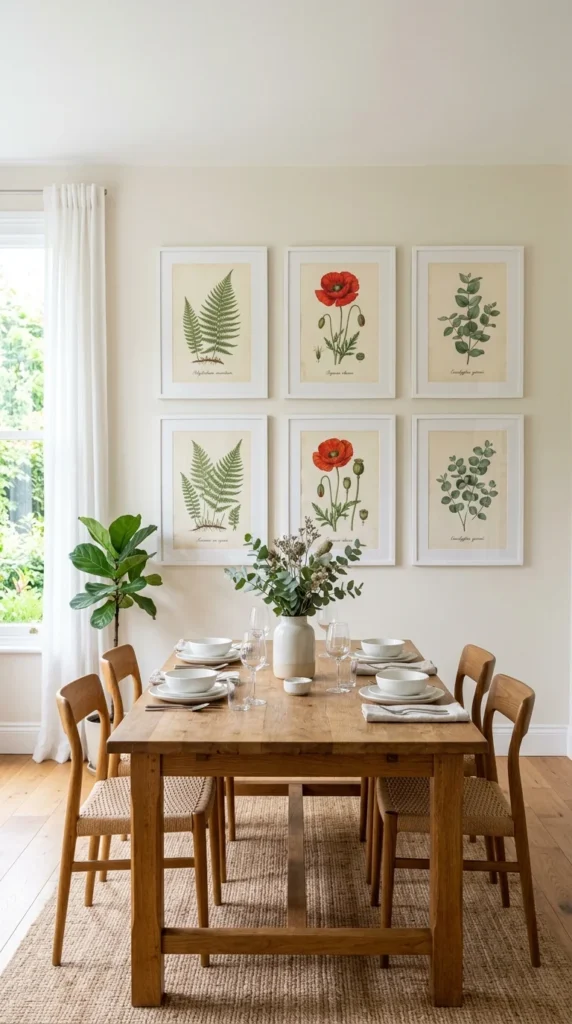
A grid of matching botanical prints is one of the most consistently elegant wall decor choices in any style of home.
The structure of the grid — perfectly spaced, perfectly aligned — creates order. The organic, irregular forms of the botanicals within the frames create contrast. That tension between order and nature is what makes it feel sophisticated.
Where to get prints for free:
- Biodiversity Heritage Library (biodiversitylibrary.org) — thousands of free antique botanical illustrations
- Rawpixel.com — curated vintage prints in the public domain
- Museum digital collections (Met, Rijksmuseum, Smithsonian)
Download, resize to fit your chosen frame, and print at home or at a local print shop.
Frame recommendation: All the same frame — white, black, or natural wood. Consistent frames in a grid look intentional. Mixed frames in a grid look messy.
Standard sizing (all 5×7 or all 8×10) makes the grid much easier to execute. Print sizes that match frame sizes you already have.
Spacing tip: Use 2-inch gaps between frames for a clean, gallery look. Measure and mark with a pencil before any nails go in.
A 2×3 or 3×3 grid works well above a dining table, sofa, or bed. Even a small 2×2 grid in a bathroom looks curated and expensive.
17. Use a Large-Format Map or Vintage Poster
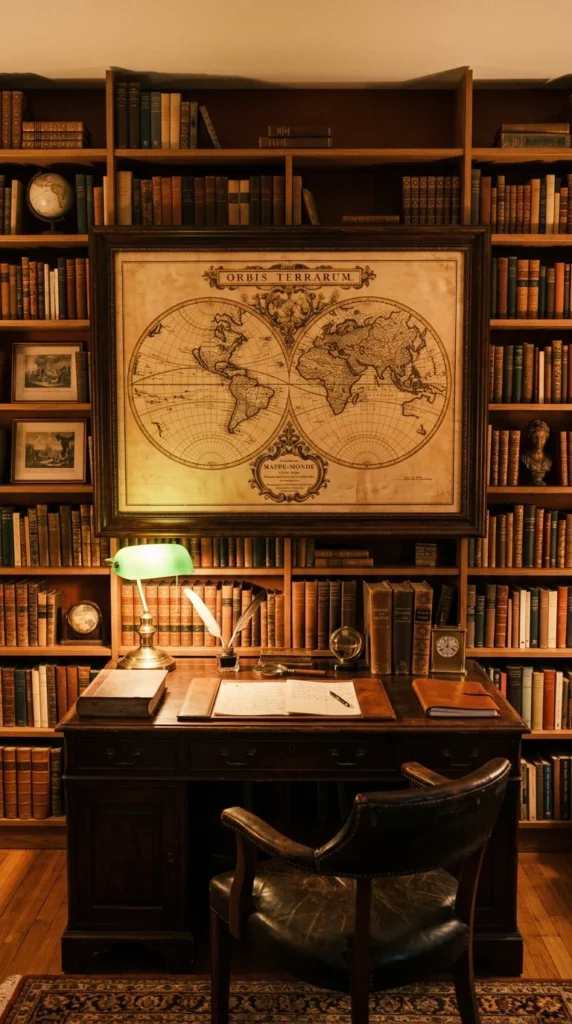
A large vintage map or antique poster has built-in character that modern reproductions rarely achieve.
A world map, city map, or botanical chart in a large frame is an instant focal point. It adds color, detail, and a sense of history that plain abstract art often doesn’t deliver.
Options at every budget:
Free: Download high-resolution antique maps from the David Rumsey Map Collection (davidrumsey.com) or the Library of Congress digital collections. Have them printed at a large format print shop (usually $20–40 for a big print on matte paper).
Mid-range: Etsy sellers offer beautiful reproductions of vintage maps and scientific charts framed and ready to hang.
Framing a large print affordably: IKEA RIBBA frames come in sizes up to 24×35 inches. Poster frames from Amazon work for even larger prints. A large, simple frame immediately makes the print look intentional and expensive.
What works best on walls:
- City maps of places with personal meaning
- Antique world maps in warm tones
- Vintage botanical or anatomical charts
- Old National Geographic or travel illustrations
Hang it in a study, living room, or hallway where people naturally pause and look.
18. Create a DIY Driftwood or Branch Installation
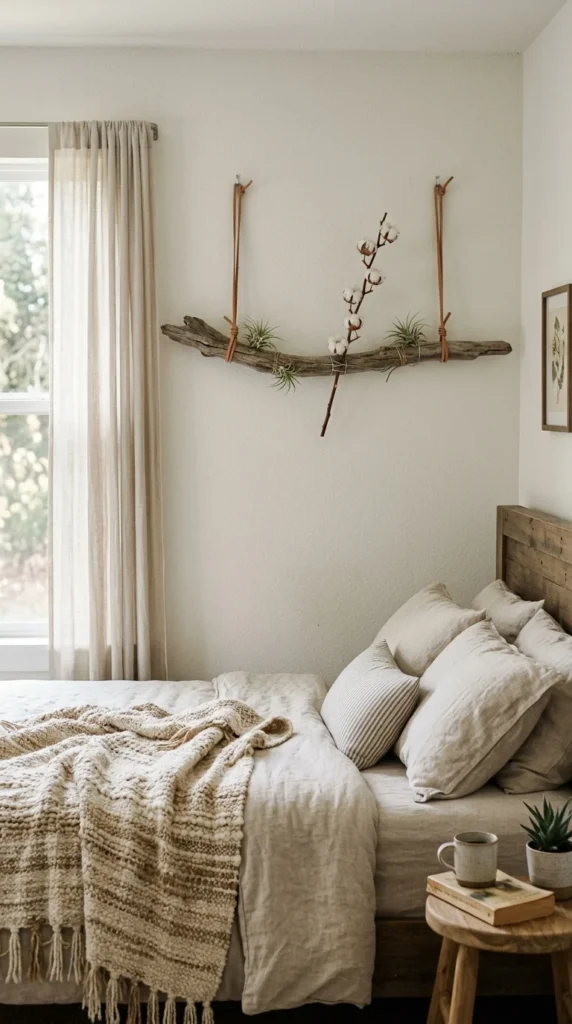
Natural materials on a wall create an organic, sculptural quality that no print or painting can replicate.
A single large branch or piece of driftwood mounted horizontally becomes an installation. Add hanging plants, crystals, string lights, or small woven elements to make it even more dimensional.
How to mount a branch:
- Find two matching cup hooks or leather loops
- Screw cup hooks into wall studs
- Hang the branch from the hooks using leather cord or raw jute twine
The branch itself is free — collected from a park, beach, or yard. Strip off any loose bark. Let it dry completely before bringing inside.
What to add:
- Air plants (Tillandsia) wired directly to the branch
- Small trailing pothos cuttings in tiny test tube vases
- Crystal points hung with thin cord
- Dried flowers or seed pods tucked into the bark
This works particularly well in a bedroom, bathroom, or reading nook where a softer, more natural mood fits the space.
Cost breakdown: The branch is free. Air plants cost $3–8 each. Leather cord runs about $8. Cup hooks are $3. Total: under $25 for a genuinely original installation that no one else has.
The imperfection is the point. Slight asymmetry, irregular knots, organic variation — these are features, not flaws.
19. Add a DIY Pegboard for Functional Wall Art
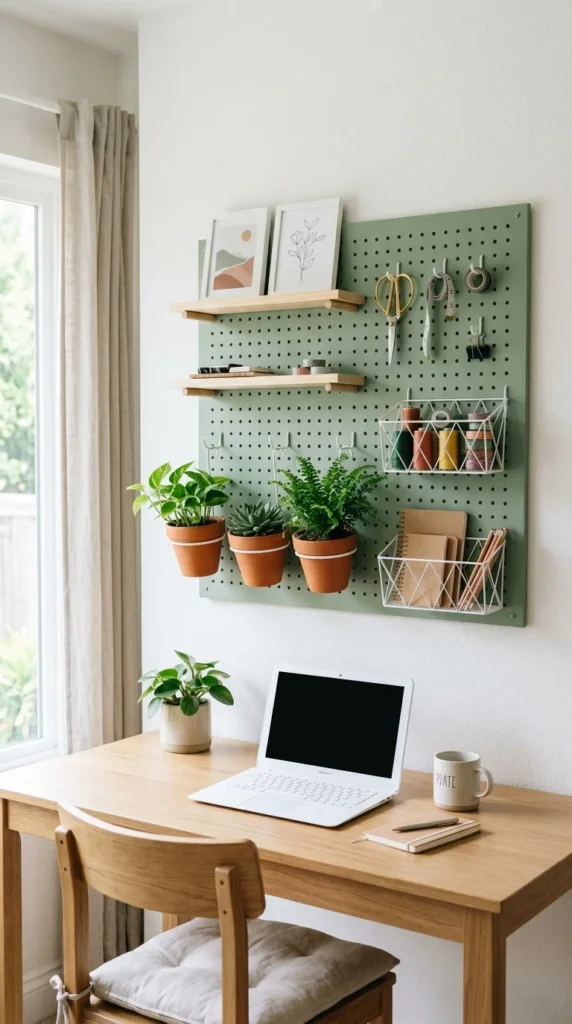
A pegboard is possibly the only wall decor idea that’s also genuinely useful — and it photographs beautifully when done right.
The secret is treating it like a styled display, not just storage.
Painted in a matte color (sage green, terracotta, navy, or dusty pink), a pegboard becomes a backdrop. Add a mix of pegboard accessories — small wooden shelves, hooks, baskets, and ledges — and then style them like you would a floating shelf display.
What to hang:
- Small potted plants in terracotta pots
- A few framed prints leaning on tiny shelves
- Notebooks, scissors, or tools in geometric organizers
- A small mirror or clock
- Trailing plant cuttings in bud vases
IKEA’s SKÅDIS pegboard is the most popular and affordable option — around $20–30 depending on size. It comes in white and can be painted any color before mounting.
DIY version: Buy a 2×4-foot sheet of pegboard from a hardware store for about $15. Sand it lightly and paint it. Mount it 1/2 inch off the wall using spacers so pegs fit properly on the back.
Works perfectly in a home office, kitchen, craft room, or entryway. This is one case where function and form genuinely reinforce each other.
Conclusion
Your walls have more potential than you might think — and none of these ideas require a renovation budget or a design degree. The common thread across all 19 is intentionality: choosing things you actually love, putting them together thoughtfully, and treating the wall as part of the room’s design rather than an afterthought.
Start with one idea that feels most manageable. Hang a gallery wall. Mount a single oversized mirror. Frame a botanical print and put it on a ledge. Small changes compound quickly. Two or three of these ideas together in one room create a space that feels genuinely considered — the kind of room that stops people in the doorway.
The homes that look expensive are rarely the ones that spent the most. They’re the ones where someone paid attention. That’s something you can do starting today.